These 4 points provided at the 4 corners of the OMR sheet are the most important components of an OMR sheet. The evaluation and accuracy of evaluation depends on the clarity of these 4 points in the scanned OMR sheet image.
Unique ID Block
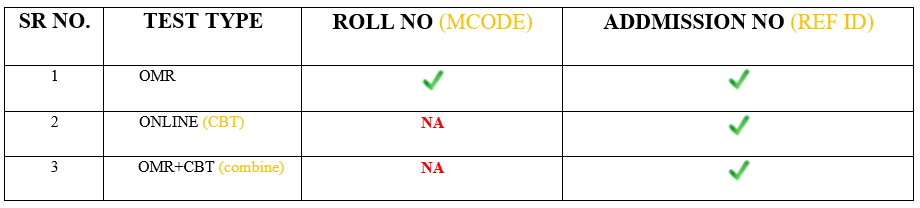
This block is required to identify to which candidate this sheet belongs and in whose record this data should be recorded. In case of Answer Sheet it is the Roll No. Block and in case of application form or data collection form, it is the Form No. block. Unique ID block may be kept on the sheet as an OMR block for the candidate to fill or as Digitally pre-printed number or Barcode.
Test ID Block
This block is required on Answer Sheet to recall the test definition to identify which set of correct answers to use for the evaluation of this sheet and how to calculate and distribute the marks into different sections.
Response Blocks
These are various types of OMR block matrices delivering different types of outputs. In case of Answer Sheet these are the question blocks to be evaluated. For an application or Survey Form these are various OMR based data collection.
Text Blocks
This is a blank area which can be customized according to your requirements, the logo and name of the institute and the column for candidate information can be printed within this area. There can be several such areas on a OMR sheet. The content in text blocks and alteration thereof does not affect the OMR sheet.
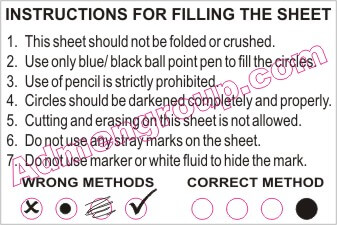
Carefully read the instructions given on the sheet before filling. Most mistakes and most common mistakes happen due to negligence in reading and following the instructions for filling OMR Sheet.
OMR sheet has to be filled using Blue/Black Ball Pen or HB pencil. Use of Pen/Pencil depends on the rules set by the exam body. DO NOT use Ink Pen as it might bloat or spill.
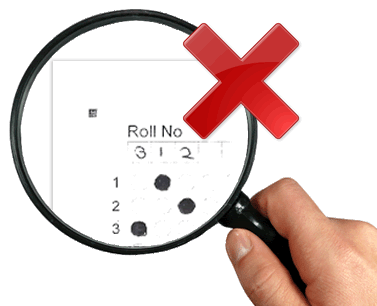
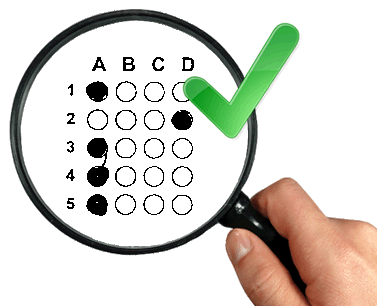
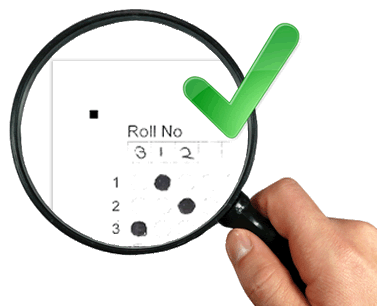
DO NOT under fill or overfill the OMR circles. Avoid partial filling or spilling out. Start filling the circle from outside in, to avoid any spilling out. First fill the circles/boxes in the OMR sheet completely and then darken the filled circles/boxes. Completely darken the respective circle for your response.
Please fill the appropriate OMR circles with due care. Avoid over-writing on OMR Sheet. Mark multiple bubbles only in case of MCQs. If you mark more than one circle in a single choice question the answer will be considered as being wrong.
What are the acceptable and unacceptable deviations on the OMR Sheet?
WHAT IS ACCEPTED?
Circles marked with Pen or dark Pencil or both on the same sheet
Slightly under filled or spilled out circles
Any sort of dirt, scratch or line between the circles
Slightly tilted scanned image of the OMR sheet
Improperly/light printed OMR bubbles
Any design layout in the Text areas
WHAT IS NOT ACCEPTED?
A scanned sheet in which all the 4 Index points are not visible clearly
A sheet in which there is dirt or line at the edge of the image, which is comparable in width to index points
A distorted photocopy of the original sheet format
A sheet not scanned as per the specifications
Modulated and transformed image files
What points to keep in mind while using whitener?
Yes you can use whitener. But before that, we need to know : Roughly how many sheets out of total (n/X) have this issue?
If the number of such sheets is not much that it will delay the evaluation process, then there is a manual mode in the software where you can correct such cases at real time. But the manual mode evaluation is slow because it waits for operator response and corrections. So if the overall numbers of sheets for an exam is less, say 100-200 then we can use manual mode. No need to do whitener exercise.
If the number of sheets is more for that exam and evaluation time is short, it would be really good if you sort these issues beforehand. So that we can run the reading process in auto mode and evaluation is really quick.
" will the OMR scanner have any problem in reading the same once we put the modified sheet in the scanner. The white fluid erased bubble should not be recognised by the scanner due to its opaqueness and should treat it as unmarked. will it do the job or we have to use a new OMR sheet which makes our job more difficult since in that case we have to transfer the answers of the corresponding candidate also."
No, you don't have to fill new sheets. The scanner will not have any problem in scanning white opaque marks. It will ignore them as unmarked.
So if you are using whitener, just take care of the following points;
Technically, there is nothing to worry about using whitener to erase a wrong bubble filling to make the right one. The OMR software is designed to read dark marks. So, when the whitener is applied to a bubble, no dark mark is left at that place. There is no confusion in this situation. Still, the practice of using whitener on OMR sheets is not common. Here are the reasons:
The whitener is usually thick coated and may start chipping while bending, stacking and storing the sheets during the scanning process.
These chipped inks of the whitener may fall on the scanner lens and create shadow marks on the image of the sheet. This can cause confusion for the OMR software, thus hampering the reading process.
Another problem is that if the whitener is not dried properly before submission, it can stick to the adjacent sheets, damaging the other sheets. It can also create impression on the adjacent papers, which can be problematic, especially in case of duplex OMR sheets.
Sheet Design Part 1: How to Design a OMR Sheet Template
by Duplicating Existing OMR Sheet Template?
IMPORTANT: Only the sheet layouts created using the OMR Software should be used. No other self-designed layouts will be recognized. This does not mean that you have a limitation to use readymade layouts only. The Addmen OMR software has a sheet designer, so you can create as many layouts using this design facility. But either the layout must be created using software or it should be calibrated in the software only then the software will respond to it.
If there are any pre-printed sheets, consult the technical support team to know whether this sheet is suitable for reading. If the sheet has necessary parameters required for calibration, then only the sheet can be calibrated and read from the software. In the Professional version of Addmen OMR Software it is possible to calibrate most pre-printed OMR layouts which have been made according to OMR guidelines.
Though new users might assume that OMR Sheet design and calibration is the first step to begin with but this User Guide is written in the sequence this software is most easily understood and operated. Creation of OMR design would be better understood if the user first learns the software operation on standard templates.
Design and calibration of OMR Sheets has been covered later in this User Guide as a part of Software operation.
Sheet Design Part 2: How to Design a OMR Sheet
Template from Blank Template?
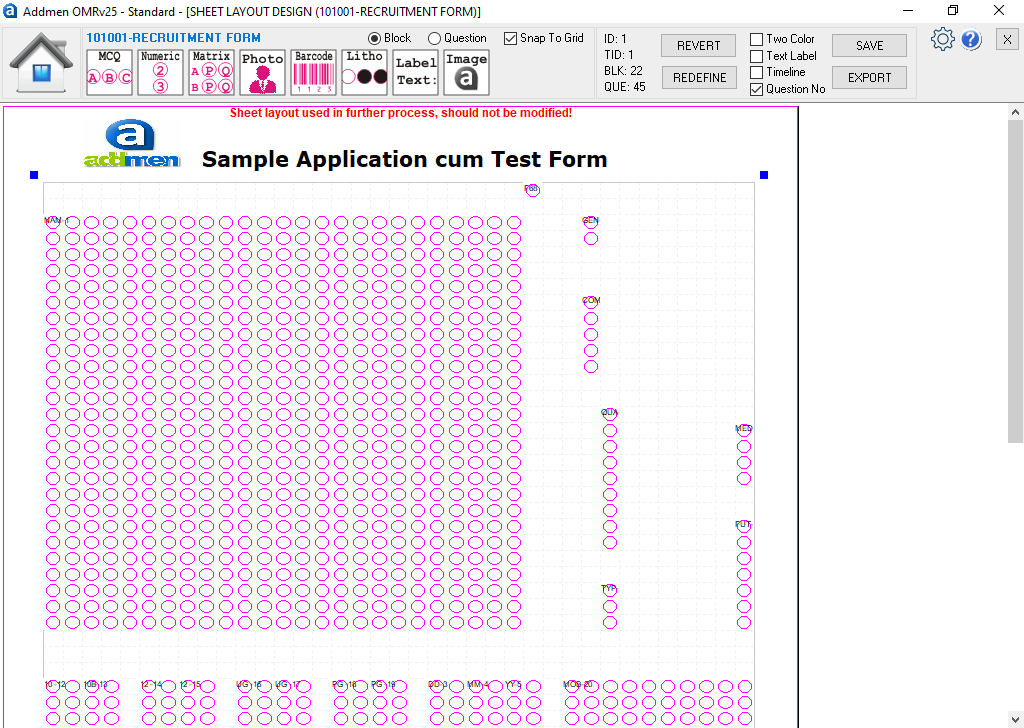
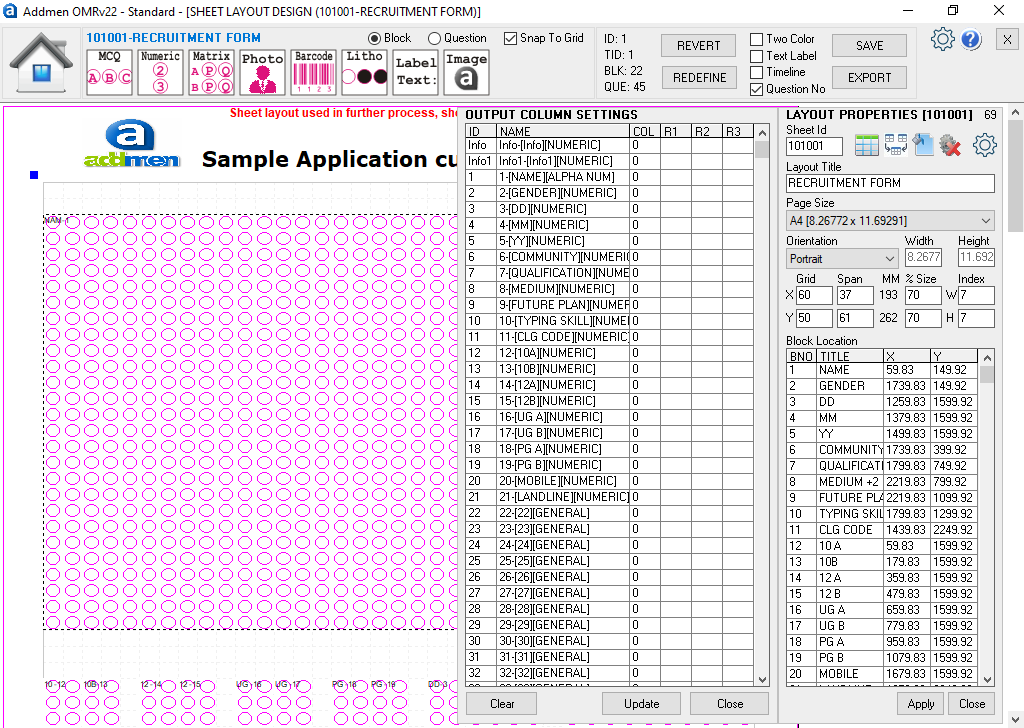
When we create a sheet, its design reading information is stored in software and its layout is exported for printing. Both parts of sheet (printed layout and reading information) are important. Just printed sheet is not sufficient because if the software does not know where to look for bubbles, it will not read the sheet correctly and this information is provided by the reading layout stored inside the software. So the layouts to be read must be designed or calibrated using OMR Software so that both printing and reading information is generated. -- [Fig 1.3.1A]
(A) Steps For Creating A New Omr Sheet Design [Fig 1.3 A]
There are two OMR modules in Addmen OMR software-Answer Sheet Checker & Form Reader. The OMR Sheet designer is an integral part of the OMR Software. It is active if any of the modules is active.
There is difference between design requirements and later treatment of an Answer Sheet and Data Collection Form. If only Answer Sheet Checker is active, we can design only Answer Sheets. If only Form reader is active, we can design only OMR Forms. But if both are active then we can design-Answer Sheets, Forms and Combo Sheets which work as Form & Answer Sheet simultaneously.
Layout are defined on the basis of 2 parameters Grid Size (distance between bubbles), No. of Bubbles (horizontally and vertically). Changing Grid size or No. of Bubbles will alter the final size of the layout.
Different grid/bubble sizes can be used like X=60; Y=60 or X=60; Y=48 or X=48; Y=45.
Preset Grid combinations like ‘A4’ OR ‘B5’ can be selected to begin a new sheet layout that fits well into a standard size of paper.
Bubble size is defined as % of grid size and size of Index point is defined in pixels on redefine panel.
Changing the margin (distance from left/top edge of paper) will alter position of layout on page.
Various types of fields in a layout are ‘Block’, ‘Question’, ‘FormID’ & ‘TestID’.
In case of Data Collection Form only one key field – ‘Form ID’ is required and any type of ‘Blocks’ can be used. In case of Answer Sheet two key fields- ‘FormID’ & ‘TestID’ are required and ‘Question’ should be placed. Only then Answer Sheet will appear in ‘Select Sheet’ dropdown list in Step 1: Define Test panel.
Various type of Readable options available for fields are- [Fig 1.3 B]
Each read type has a different arrangement of bubble array. Their output is shown on right.
Various sizes of fields with required count of rows and columns can be added by using ‘+’ button.
Blocks preferably but Questions should be essentially placed in the sequence as they are to be read.
Right Click on the field to delete or to change properties of selected field.
New Question/Block with identical definition can be inserted in between by right clicking and using ‘Insert Duplicate option in context menu.
Fields can be moved with or without snapping either using arrow keys or mouse. Press Shift+Arrow to move double grid and CTRL+Arrow to move half grid distance. Alter ‘Snap to Grid’ Check box to activate or deactivate snapping.
Ideally it should not take more than 10 minutes to design any sheet in the Design Panel.
(B) Upload & Download Facility
If your design is final and is being read properly, press the UPLOAD button to upload it on Addmen Server to keep it safe.
You can check the ‘Lock Design checkbox so that this design is safe on the server and yourself or no other user ever overwrites it by mistake.
In case of data loss at your end you can regain your sheet template back by downloading it from the server. Press the 'DOWNLOAD MY SHEETS' button to do so.
Uploading facility can be used in case of distributed branches where one branch can create a sheet design and upload it for other branches to download.
(C) Using Standard Templates
Though you can yourself create as many new templates as you want, but to make your work easy and to avoid repetition, the software has many inbuilt layouts that are frequently required. These templates can be used as a starting point to quickly create your desired template with minor changes.
You can download these several ready to print and commonly used templates created by Addmen by selecting the ‘Download Template's and click OK button.
These basic layouts cannot be edited directly. For editing in standard sheet template first you have to duplicate it and then you can do customization in the duplicate copy and save it by new name.
While you edit the reading information of fields on the sheet in the Create Sheet Design Panel, mostly there is no need to export the design again unless there is any inclusion of new blocks or change in location of existing blocks. If you have only deleted or reduced the number of rows or columns of some blocks then you may save the changed design in the panel and directly edit the exported standard file in DTP software.
1.3 A
1.3 B
Can the answer sheets be designed in Microsoft Word ?
Yes the sheets can be designed in word and read in Addmen software. You would need Advanced Sheet Designer module that allows design of sheets in word.
So far as designing externally directly in Microsoft Word is concerned, we need to understand that Designing in word is just a superficial term. Just designing the sheet is not the end of the task. What before & after that?
In case of the other software you design in word, print & scan and then calibrate for hours. Plus prints and scans are obviously prone to distortions. So your zero (the basic sheet used for calibration) is not a zero actually. Its already moved or distorted.
Addmen software adopts hybrid process and eliminates need of spending an hour in calibration of Word Templates. This conventional approach has a limitation that the calibration is based on human judgment and will differ from user to user. This leads to inconsistency in results.
The Addmen OMR Software approach is totally different. The sheet template is first calibrated in the Addmen OMR Software and then exported to word for further ornamentation in word. This approach delivers zero-zero calibration.
Can I design my own OMR Sheet?
Yes you can design your own sheet. Export it to many formats like SVG, CDR, PDF, DOC and print it as any regular file.
Yes that design can contain block for image(photo) and can be read at the same time when OMR bubbles are read.
Data obtained from OMR bubbles can be validated for some mistakes at real time and later also.
How to avoid black lines in OCR-ICR sheets.
In OCR & ICR, the coloured clepped image is taken, converted to b/w at 100 treshold and checked for more than 10 black pixels. If found, its original version is passed for reading. If not found the image is treated as blank & skipped.
This question wouldn’t arise if a pencil was used to fill the OMR sheet. Generally the examination bodies that chose to allow the possibility of changing the answer key, they instruct to use the pencil. This was mostly the procedure is starting years of propagation of MCQ type objective exams. Even today pencils are used in some exams but mostly for exams of junior grade students. But if pencil is to be allowed then the OMR answer sheet has to be colored OMR sheet to allow for color dropping and contrasting of lighter for pencil marks for proper reading. So there is a limitation.
Now a days, self-designed and printed OMR sheets are in use. Most users use black and white OMR answer Sheets printed on your own laser printer. Use of pencil is not suggested on a black and white OMR sheet. So the students are instructed to fill with pen. Also, in order to keep the task simple for the examination body and to avoid any contentions, the examination bodies have now started to make the use of pen as mandatory.
The examinations that instruct to make use of pen do not obviously expect the candidate to change the response once marked. But in any case if it is at all required to change the response marked with pen then following two options provide remedy. Addmen OMR Software has both these provisions.
First Approach example : ‘A’ changed to ‘C’
This approach already exists in the current version. However the sheet design procedure is a little different, where the bubbles are placed more distant and concentric circles are placed over them.
This is the best approach for cancellation of response as the structure of the sheet still remains quite same as the simpler version of basic sheet, with the only difference being of concentric bubbles. So it is less space consuming and not at all difficult or confusing for students.
A B C D
A B C D
Second Approach: ‘A’ changed to ‘C’
Second approach has been introduced in the upcoming version 16. In this provision to cancel a filled response, there are two alternate rows of questions. The first row is for correct response marking and second row is for cancellation of the response marked in the first row. Since this method requires much more space than its simpler basic counterpart, so it is not suitable for OMR answer sheets where there are large number of questions.
Secondly the sheet layout and question location also takes an altogether different layout, so there are quite many chances of students getting confused and marking the bubble in the wrong row. Still this approach has been found to be more suitable by some users.
FIELD SETTINGS KEYWORD
LEN0=REPLACE STRING IF BLOCK VALUE IS BLANK
LEN1=REPLACE STRING IF BLOCK VALUE IS NOT BLANK
MERGE=JOIN BLOCKS STRINGS
ADD=ADD BLOCKS VALUES
Only the designs that are either created using the OMR Software or have been calibrated into it, can be read by the software. No other self-designed layouts will be recognized.
If you are going to use the software for any pre-printed design, please confirm in consultation with the technical support team about the technical correctness and feasibility of design.
For printing, prefer to use the source file of the OMR design as exported by the software (CorelDraw-CDR, InkScape-SVG, Word-DOC). This source file can be edited to add your organization Name, Logo and other necessary information without disturbing the Index points or OMR readable blocks. PDF file should be used for printing only if source file is not available in SVG or CDR format.
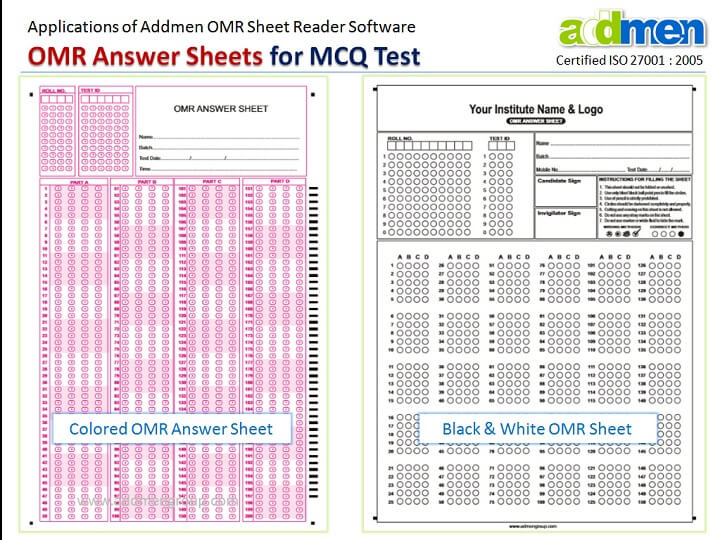
Black and White OMR sheets are very well suited for daily work having full bubbles filled with pen. But Colored OMR Sheets should be essentially used if,
the pattern of marking allows tick marks or thin strokes.
pencil filling is allowed.
sheet contains OCR/ICR readable blocks.
Use thicker paper (minimum 100 gsm) if it is a double side filling sheet. For sheets with single side filling, normal thickness paper is OK. In any case paper colour should be white. When you want to differentiate various categories of OMR sheets on basis of colour, DO NOT use coloured paper. Instead use different colours to print OMR sheets.
Proper instructions must be given on the sheet about How to fill OMR Sheet?
Invigilators must also be given proper instructions about proper handling of OMR sheets.
Few sheets should be printed and checked before printing the final lot.
Laser/Inkjet Printing >
OMR Sheets can be printed using a Laser Printer or rizo graph or digital copier printer.
For standard templates the default paper size has been taken as ‘A4’ (210mm X 297mm) but mostly the standard page size in office printers is set as ‘Letter’. Set the printer page to A4.
Offset Printing >
OMR Sheet can also be made through Offset Printing.
Only print using Plates. DO NOT print using tracing sheet or master.
Use the CorelDraw or SVG file to make plates from computer. Do not use JPG files to make plates.
While cutting the sheet after printing, all pieces should be of equal size and equal margins.
Photocopy Printing >
Copies of OMR Sheet can also be used if the copier machine is giving good quality copies.
Please make sure the size of the copy is same as the original.
Please make sure that the Index points are solid black.
Please make sure there is no black dust or line over the bubbles or near the index points.
If you are first time user, avoid using photocopies.
Precautions for OMR Sheet Printing
DO NOT alter the Size of the sheet format.
DO NOT alter the relative location of Index points or OMR/ OCR/ ICR blocks or any other software readable blocks. Keep it same as exported by the software.
DO NOT increases the line thickness of bubbles. The line thickness of the circles is kept thin to avoid interference in reading. If you make the bubble outlines very thick the software might read all bubble edges as response because ultimately software is made for reading dark areas.
Increased Outline Thickness
Proper Thickness-Default Settings
In any method of printing: Laser, Offset or Photocopies, ensure that 4 Black Index Points on 4 corners of sheet are properly printed.
The index points should be printed Solid & Dark in Black color. If the index points are not properly printed, they will not be scanned properly and it will give trouble while reading.
Hazy Index Points
Patchy Index Points
Solid Index Points
DO NOT print anything else outside or close to the Index points.
If sheet includes a cutting or tearing margin, it should be sufficiently far from the index points.
Improper Distance from Edge of Page
Reasonable Distance from Edge of Page
Any dirty or misprinted/misaligned sheets or faulty while cutting should be eliminated right at the time of printing. DO NOT USE SUCH SHEETS.
Colored OMR Sheets can be printed using Laser/inkjet printer. Check that the printer is able to print without smudging or blotting.
Colored OMR Sheets can also be printed using offset printing.
Only 2 colors should be used for technical reading purposes. One color Black is necessary. Second color can be pink or orange or golden yellow. Green or blue tones should be avoided.
In case of Offset printing, the corner black index points are printed in both colors, such that they exactly overlap and there is no relative displacement i.e. zero-zero registration.
You will provide your number series in Excel as input which the variable data printing module in the software will convert and print in Binary.
Yes the XY location refers to the Barcode/lithocode location on paper, in case you are using preprinted OMR sheet. The user will set his desired location where he wants to print the lithocode.
You may scan answer sheets using any Flatbed or Automatic Document Feeder (ADF) Scanner.
Addmen OMR Software correctly reads even rotated, skewed or distorted OMR sheets. But we should keep the sheet holding plastic brackets in the scanner pocket close to avoid the sheet from straying and prevent from tangling or unnecessary tilting in the scanner.
Keep the scanning area wide enough so that the corner 4 index points are properly scanned and there is sufficient white space outside them.
Scan as "Image / Picture". DO NOT scan as "Document".
Save as JPG, TIFF or BMP file only. DO NOT save as DOC/PDF.
If scanned in JPG or TIFF, take care that image compression is not too much such that the image is unreadable.
DO NOT scan in multi-page TIFF, scan as single page TIFF.
If scanned in Multipage TIFF, software has inbuilt converter to split into Single page TIFF.
Can all answer sheets of one exam be scanned as a single PDF or TIFF file?
First of all PDFs are not read. PDF is a document sharing format, it is not meant for image processing.OMR reading process requires image processing so it handles image files like JPG, BMP, TIFF, but definitely not PDF.
We do handle multipage TIFF. But we prefer to break it into single image TIFF files. We have inbuilt provisions to auto split into very small size files. We have many new features that provide more facility with single files. And there are many reasons and advantages of having this approach.
Multipage files processing has certain limitations. So we do not read multipage PDF.
What if one sheet was torn or incorrectly scanned and needs rescanning? And what if one sheet has to be instantly located? Some specific sheets might be skewed or tilted during scanning they are specifically handled and reoriented singly by the software. We have the possibility of realtime display of sheets for resolution of issues and corrections. Selective files can be read and re-read.
We have the provision for online display of OMR sheet to individual candidate. So we definitely want to have individual files, rather than loading the whole lot for each candidate. In our system each file is automatically renamed by unique ID filled / provided on the sheet.
Can I read a PDF file?
PDFs are not read. PDF is a document sharing format, it is not meant for image processing.OMR reading processrequires image processing so it handles image files like JPG, BMP, TIFF, but definitely not PDF.
Does the software accept both Single-Page (multiple files) or Multi-page (single file) TIFF formats? [Fig 1.6 A]
No we do not read multipage PDF. We do handle multipage TIFF. But we prefer to break it into single image files. Multipage files process have certain limitations. We have provisions to auto split. The size is very less. We have many new features that provide more facility with single files. In our system each file is automatically renamed by roll no filled / provided on the sheet.
What if one file was torn or incorrectly scanned and needs rescanning? And what if one file has to be instantly located? Some specific files might be skewed or tilted during scanning they are handled and reoriented singly by the software. We provide possibility of real time display of sheets for resolution of issues and corrections. We have the provision for online display of sheet to students. Selective files can be read reread. And So there are many reasons and advantages of having this approach.
Scan at 100 dpi. If not available in scanner, scan at 150 or 200 dpi and correspondingly change the dpi settings in settings menu.
100 dpi scanning for OMR is absolutely as accurate as higher dpi so no need to scan at higher dpi.
It is best to convert images scanned at higher dpi to 100 dpi using the inbuilt feature in Addmen OMR software for faster performance and lighter file size.
Sheets with Barcode/ OCR/ ICR/ Image are usually scanned at 150-200 dpi.
OMR sheet can be filled using Blue/Black Ball Pen or HB (or darker) pencil. Use of Pen/Pencil depends on the rules set by the exam body.
It is best to fill the OMR sheet with pen to avoid any variation of intensity of darkness of marks.
If pattern allows pencil filling, a colored sheet with thin outlines and big bubbles should be used.
In case pencil filling is allowed most candidates bring various types of pencils and make a wide range of marks from very light to dark.
The software has the capability to detect light marks and dark marks by adjusting the detection sensitivity in the settings.
Data will be read accurately but too much variation in lightness and darkness of the sheets will lead to many prompts and alerts by the system. To minimize this, the scanning should be dark so that even light marks are scanned dark and the judgement policy should be decided beforehand.
Download Software Setup (OMRSETUPvX.ZIP). The setup file is same for both OMR & Question Bank Software.
Unzip and run OMRSETUPvX.zip file. During the setup, it will only ask for change in installation location. The default location of installation is C:\ADDMEN which can be changed if desired.
After installing the setup, ADDMEN folder is created at C:\ADDMEN or in the location you selected and required shortcuts are formed at the Desktop and Programs Menu.
In case the installation fails, kindly turn off Firewall, Anti-Virus and run the Setup again as Administrator by right clicking on the Setup file.
NOW THE SOFTWARE IS INSTALLED AND READY TO RUN. But it will need the license key to run. The license key is either provided in the form of a combination of USB dongle and PC registration. An unregistered USB dongle license can be used on any PC for a limited number of runs. This is a SoS provision. The license must be registered on a specific PC.
Attach the USB Lock sent to you on an active USB port on your machine. The lock is a plug and play device and needs no driver installation. The lock will not show up as a pen drive amongst other drives.
Run the OMR/Question Bank Software using the shortcut given on the desktop. The software will run and you will reach the main screen.
If you have not been provided the USB dongle then please inform the 32-digit Key prompted to you in the message when you try to run the OMR Software. We shall activate your softkey so that you can run the software without USB dongle.
If the software installed with the setup is not working with your key, then please carefully read the messages given. The messages are explicit and guide you what to do.
If technical help is required, contact technical support team by raising Support Ticket from www.addmengroup.com/support.htm. The updated contacts of the Technical Support Team are also provided on the same webpage.
Keep ready with good speed internet connection for troubleshooting/training via desktop sharing.
If you are an existing OMR/Question Bank Software User and wish to format your machine or reinstall the software, first take a backup of existing ADDMEN folder in a CD.
Run the setup as explained above. ADDMEN folder will be created at C:\. This is a blank folder with no data as it has been freshly installed. Delete this newly created ADDMEN folder and replace it with your existing backup of ADDMEN folder.
What platform does it operate on? (MAC/Windows)
All our software operate on windows. Not on Mac
Why my sheet layouts are not visible in Define Test > Select Sheet Layout Dropdown?
After a fresh installation, sheet Layouts downloaded previously may get removed.
To download sheet layouts again, go to OMR Answer Sheet Checker > Create Sheet Design > Click Download.
If you wish to update your running setup,
You will need only to update the EXE.
It is important to know there is difference between installing the new software setup and updating the old running the software setup with new updated features.
The method to reinstall the software has been explained above.
Reinstalling software is required only when you are changing or reinstalling your computer.
If your old OMR setup is running well on the computer and you simply want to use the updated version, then you will not need to download and run the entire setup.
You will need only to update the EXE.
Open the software and see the version of the program on the homepage of the software.
Download the latest updated EXE from
https://support.addmengroup.com/Login.aspx
Unzip and paste the extracted file into the C:/Addmen folder.
It will ask to replace the previously existing EXE.
So replace it. The previous OMR software should be kept close when you are replacing.
Now we see that all data and settings are still there because we did not run the fresh setup, that would replace with the blank data. Instead we just changed the program file which will look and behave differently while still using the same data and settings.
After replacing open the software, the new program will open up.
See the version of the program on the homepage of the software.
If it is changed, you have successfully updated.
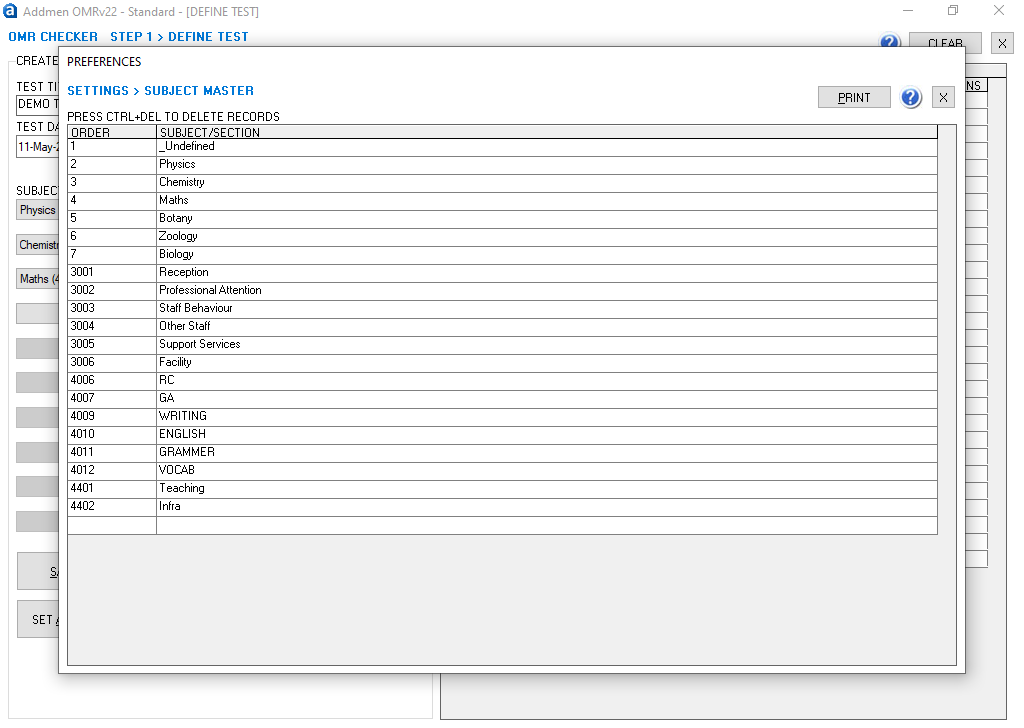
Replace Section1-Section5 with the sections/subjects in your institute.
Remember the section names must be entered in the same sequence in which you plan your test e.g. Physics, Chemistry, Maths or Economics, Law, Statistics etc.
The order in which you create subjects (Section ID) is the order of subject columns in all reports and in Online Score board panel.
One test can contain maximum 5 major sections. For more than 5 sections, multiple Topic Tags are used.
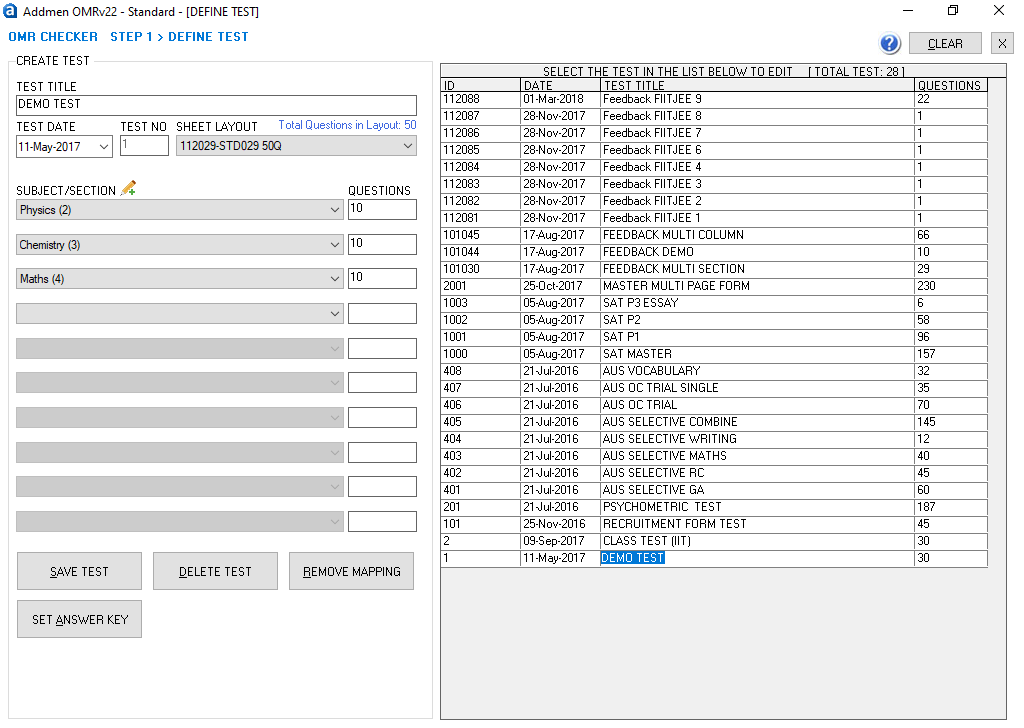
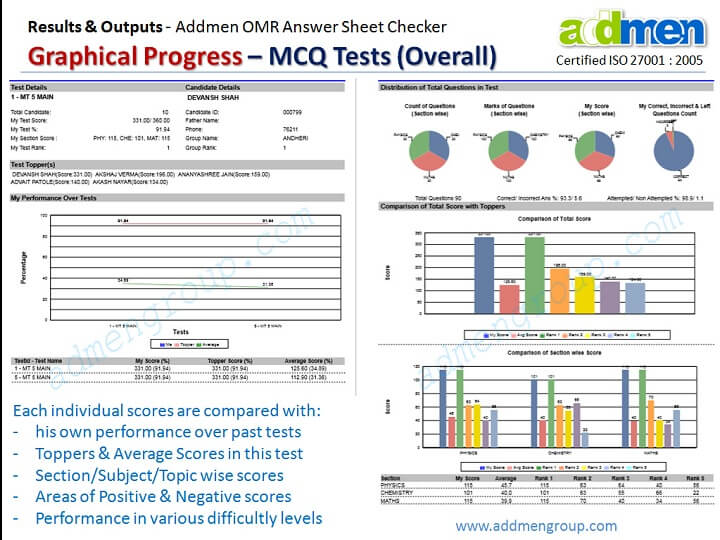
Set parameters like Test Name, Test Date, Different Subjects included, Number of Questions for each subject, Cut-off marks (if any). [Fig 3.1A]
Test Tittle [Duration] Field - Insert Test Title. (Example:- SAMPLE TEST)
Sheet Layout Field - Select Sheet Layout according to the design which you have distributed for this particular Test. On a sheet of 100 questions, you can take a test of upto 100 questions.
Subject/ Section Field - Select subjects as per your test sequence with the help a drop down list.
Ques Field - Number of Question for that particular subject.
Cut Off Field - Cut off marks in a subject are used as a parameter at the time of reporting or plotting Graphs and other analytical reports. If you do not enter anything into this field, it will be automatically taken as 0.
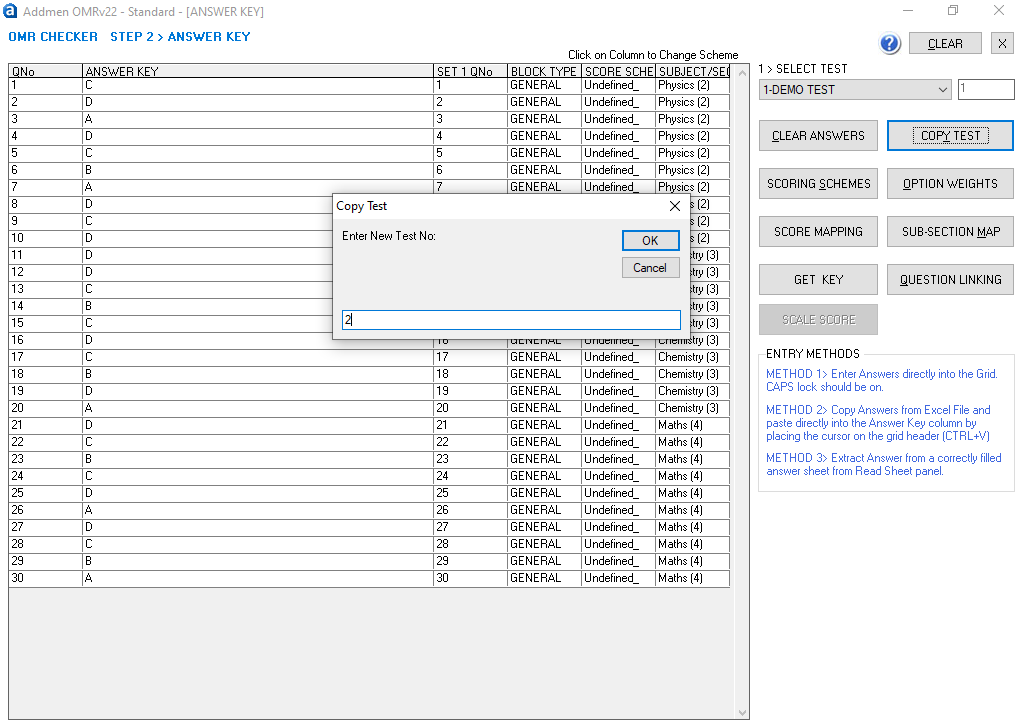
If you need to do duplicate a test with same Test definitions and Mappings just because the answer key & marking scheme has changed, then go to OPERATION STEP 2 > SET ANSWER KEY, select the test you want to duplicate and click copy test button. [Fig 3.2A]
Answer Key can be 1) entered manually; 2) copy-pasted from Word file or Excel sheet; 3) extracted from a correctly filled sheet. Adjacent figure shows how to enter answers from Excel. The answers string should be typed in single column of Excel or word file without any labels or bullets. [Fig 4A]
1.a
2.c
3.b
1
A
2
C
3
B
4A
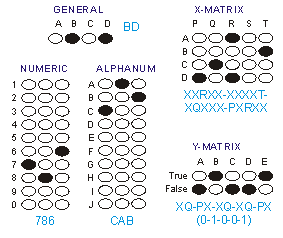
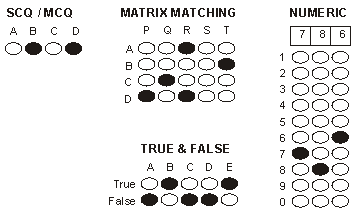
Following types of Question Blocks are supported [Fig 4B]
Single Choice/Multi Choice
Horizontal Matrix (Matching Type)
Vertical Matrix (True/False Type)
Numerical
(A) Sample answer string:
SCQ/MCQ type question (Block Type GENERAL ) : A, AC, BCD
Integer type question (Block Type NUMERIC): 9, 23, 0346, 346
Matching (4x5) type question (Block Type X-MATRIX) : XXRXX-XXXXT-XQXXX-PXRXX
True/False(2x5) type question (Block Type Y-MATRIX): XQ-PX-XQ-XQ-PX
4B
(B) To cancel a question, leave the answer key blank. [Fig 4C]
You can create any type of marking scheme according to your test planning.
This involves setting the Evaluation Criteria and the Marks applicable thereof. This task is not required to be performed before every test. The marking schemes can be created whenever there is a change in the paper pattern or marking pattern.
Basic Marking Scheme exists by the name “General”. Its name and marking pattern can be changed but it cannot be deleted. You can create new scheme by entering new scheme names.
In the POSITIVE & NEGATIVE Marks fields, enter the positive and negative marks applicable when the entire question is correct or incorrect.
In the PART POS & PART NEG fields, enter the positive or negative marks applicable when one option or a part of the question is correct or incorrect.
BONUS marks are usually equal to correct positive marks and are uniformly allocated to all candidates if a question is cancelled.
Choose a standard evaluation mode. Usually Mode 3 suits MCQs as it is the super set of all conditions. Mode 2 is suited where partial or proportional marking is applicable like in matrix matching questions.
To evaluate only a limited or first 25 questions in a section, create a marking scheme with “TOPxx” as prefix to the name. For e.g. TOP25, TOP50 etc.
In case there is any amendment in the marking scheme of a test once it has been evaluated full or in part, then the result must be recalculated by pressing the CALCULATE button on the Results panel.
4.1A
(B) Set Marking Scheme [Fig 4.1B]
Different marking schemes can be set for different questions. In the beginning all questions bear the default marking scheme and thus are checked according to the properties of this default marking scheme.
Marking Scheme can be changed from the Answer Grid. To change the scheme in bulk, Click on the MANAGE TAGS Button in ENTER ANSWER KEY Panel.
Some test paper pattern bear variable marks for each option in each question. Marks can be set for individual options or combination of options also. [Fig 4.2A]
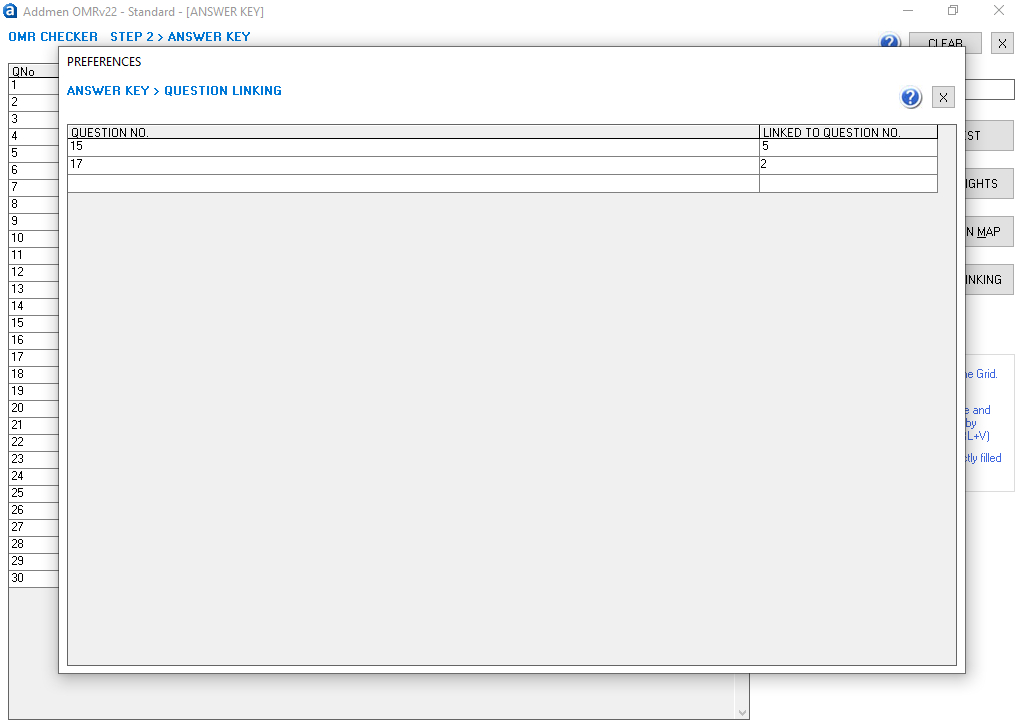
Some test paper pattern comprise of interdependent questions which implies that if Q.12 and Q.17 are linked to Q. 3, then Q.12 & Q.17 will be evaluated only if Q.3 is correct. These type of questions are used when the concepts are to be evaluated. So if Q.3 is core to the concept, and if it has not been answered correctly then, there is no consideration for Q.12, 17 or any other question evaluating the same concept. [Fig 4.3B]
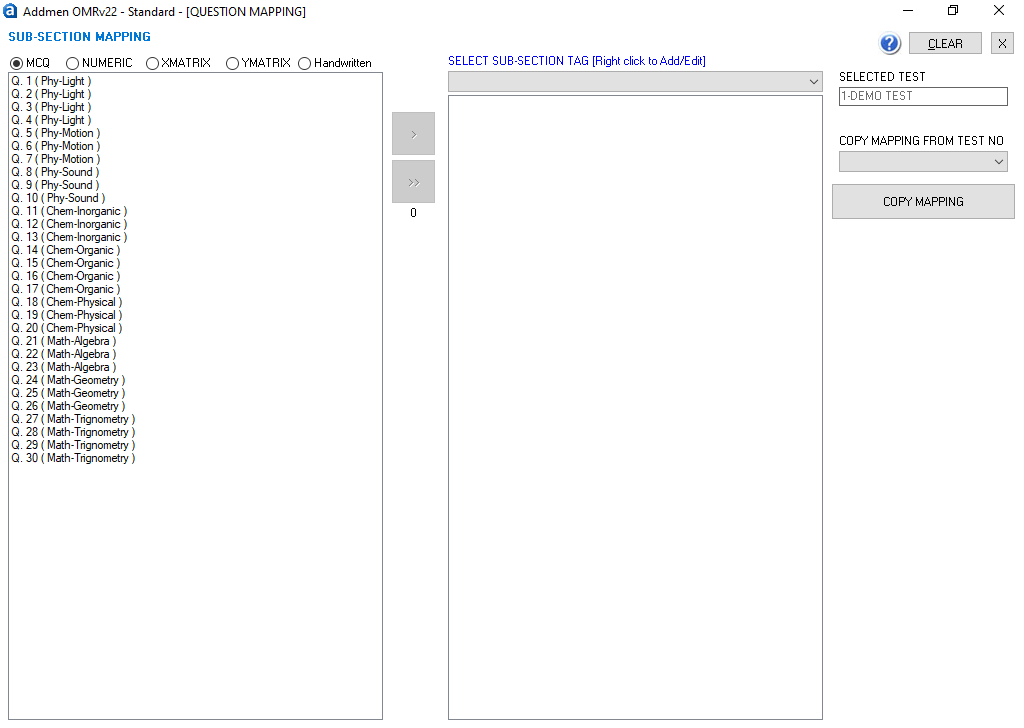
In Topics Master you can create multiple Topic Tags. For e.g. if section/subject is Physics, Topics can be Light, Sound, Electricity etc. Tags can be grouped by putting a prefix separated with “-“. This will facilitate to provide group wise results for tags (explained later in results section). [Fig 4.4]
It is always a good practice to print and validate it manually again after you have entered the Answer key either by typing from keyboard or by importing from excel or by scanning a correctly filled OMR sheet.
It is important to doubly ensure that you have not made any human or technical error If the answers are not pasting correctly from Excel, then it indicates that the database is not in proper health. It is then suggested to run the Backup & Repair command from the homepage.
After running the backup and repair of database, paste the answers again.
At this point you would require scanned images of OMR sheets. Instructions for sheet printing and scanning format have been explained in earlier sections. [Fig 5A]
Sometimes many sheets have to be read during adjustment of settings. So these files get renamed during dummy reading. It is always a good practice to keep a copy of scanned images folder and read this fresh folder, once the settings are done.
Browse the folder where you have kept your scanned images. Remember this folder can have any name and should preferably be placed anywhere on your hard drive. Use of a network folder is not suggested as the speed of evaluation will be negatively affected by the network speed.
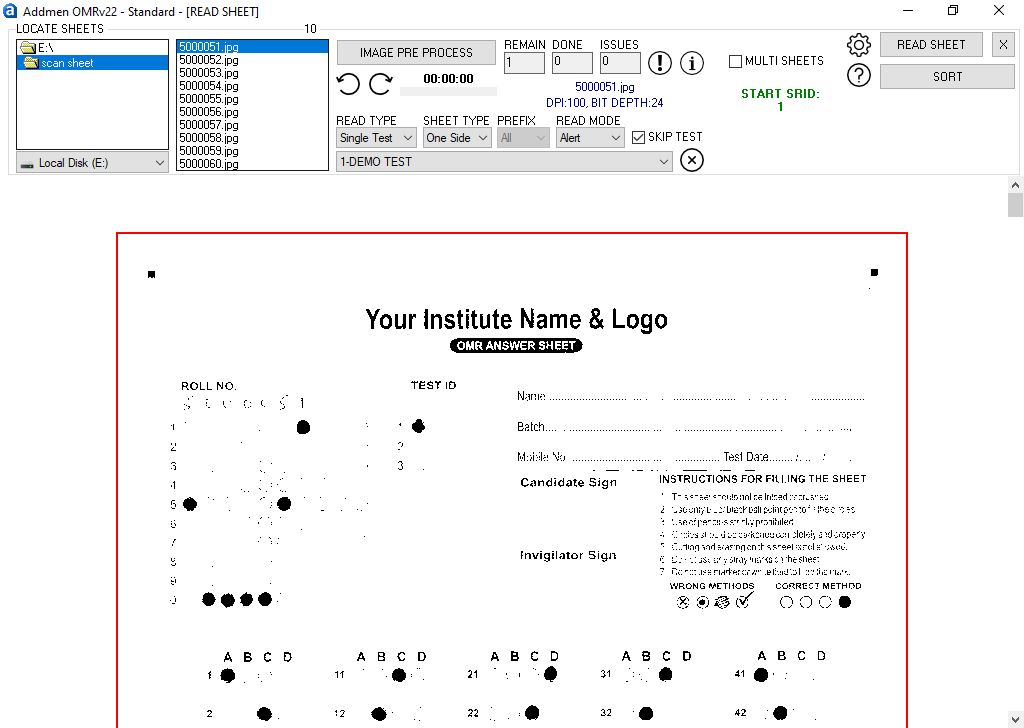
Select the sheets to be evaluated by click and drag in the files list. In case of Answer Sheet Checker, select Test ID on behalf of which you are reading these answer sheets. In case of Form Reader select the form layout for which you want to read the data.
First select few sheets one by one and adjust the margins and settings like Read Threshold, Upper & Lower Threshold etc. Read time Settings are explained in detail in the subsequent section.
Clipping margins are visible as red lines. Margins should be so adjusted that the index points of most sheets fall inside the defined margin and all the blackness or dirt on the edges of the scanned image are outside the margin. There would be rare cases that will be skipped because they do not fit in the common margin defined for major lot of sheets. So we can adjust the margins separately for each of these when we are solving skipped cases. Once such cases are solved, the margins should be set to back to default for that lot. Margins can be adjusted by dragging.
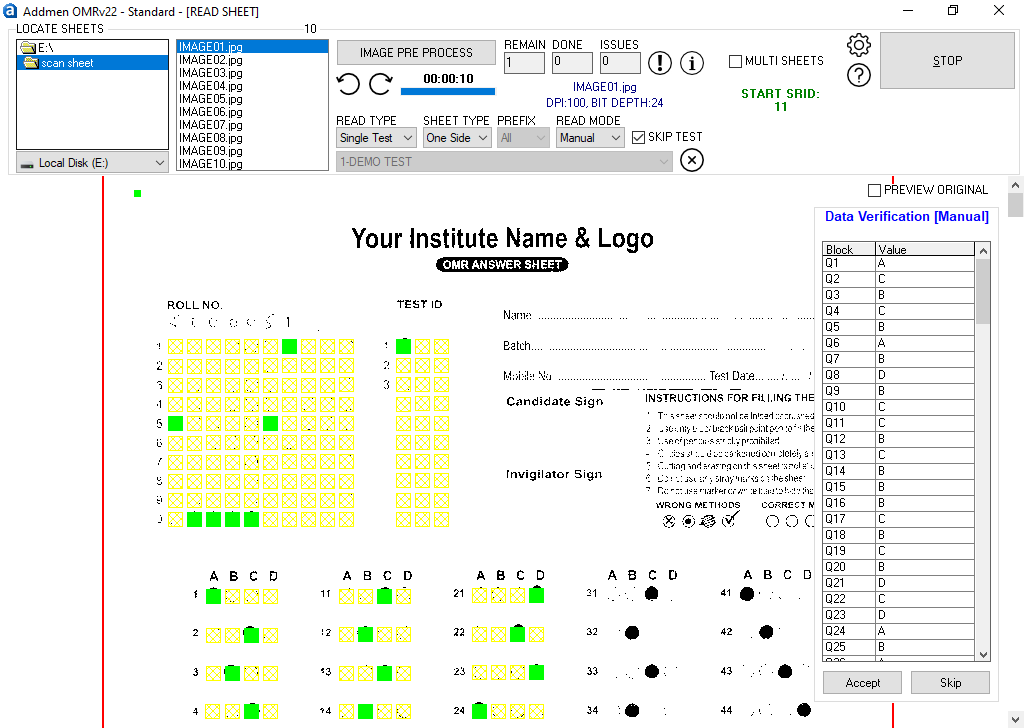
Adjust the sheet preview vertical scroll so that the Form ID (and Test ID) block is visible because it will be convenient to respond when the software will prompt for issues related to roll no. filling.
There are three evaluation modes namely, AUTO; ALERT; and MANUAL. In case of repeated work in a given mode it can be set as the default read mode from the settings menu.
Select ‘AUTO’ mode first to clear out maximum cases in which there is no issue related to printing, scanning or filling by the candidate. In AUTO mode maximum trouble free sheets will be evaluated at highest speed and the sheets that have any issue to be attended by manual judgment, will be skipped and renamed with a prefix of Sort Code.
Secondly, ‘ALERT’ mode should be selected. It is more efficient to select sheets with similar error sort code prefixes and read simultaneously. If there is possibility of too many errors in the chosen lot of images, then first select ALERT mode to avoid wasting time in AUTO mode when you already know that most cases will be skipped. If there is a possibility of too many errors in Form ID/Roll Number or Test ID filling, then select ‘MANUAL’.
To start reading, press the READ SHEET button. Sheets will be renamed after reading as TestID_FormID.BMP.
To check multi-set tests, answer sheets of multiple sets of a test can be collected and scanned mixed up in the same folder. Check the ‘Series’ option and select the series to read from the list in the dropdown.
Before reading, the sheets can also be sorted in the software by pressing the SORT SHEET button first instead of READ SHEET. Once the sheets are sorted the files will be renamed as Testid_ScanName.BMP. Now select the sheets of specific Test ID and press READ SHEET button.
To get answers from a selected answer sheet, press the GET KEY button.
There are several types of issues created by the candidates in filling their ID. Sometimes the ID is left blank or multiple bubbles are filled in same column or there are duplicate IDs where one candidate fills the ID of the other. All such cases are identified and sorted. But if an ID is filled which is not expected to be read, for example if a candidate present in the test, by mistake fills the ID of a candidate who is absent in the test, or an ID which does not belong to your institute, then there is no way to detect that this candidate was absent or irrelevant. For this a list of (present) candidates can be imported into the software, and the option of “Read Registered only” is selected so that it can tally the IDs at realtime and prompt if any such case is found.
Most scanners name duplex sheets in running serial order. You can rename the entire lot according to duplex pattern with suffixes A & B for both sides of the sheet using the Convert panel. In case of duplex reading the Duplex option is checked and the first layout is selected in the test list.
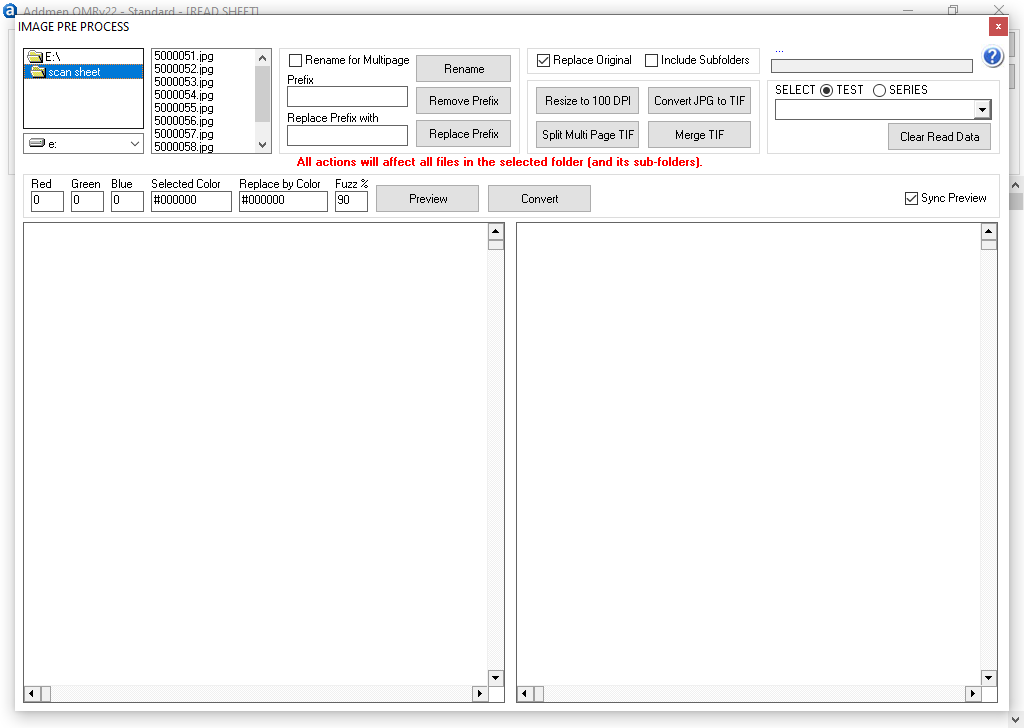
If we want begin fresh evaluation, first delete the result of that test or form from the RESET IMAGE & DATA panel. Also because few files might have been renamed during previous reading. You can also rename the sheets for visual convenience using RESET IMAGE & DATA panel, so that the files bear uniform name pattern as at the time of scanning. There is also provision to convert images scanned in JPEG or Multi-page TIFF to Single Page TIFF or BMP file format. [Fig 5.1 A]
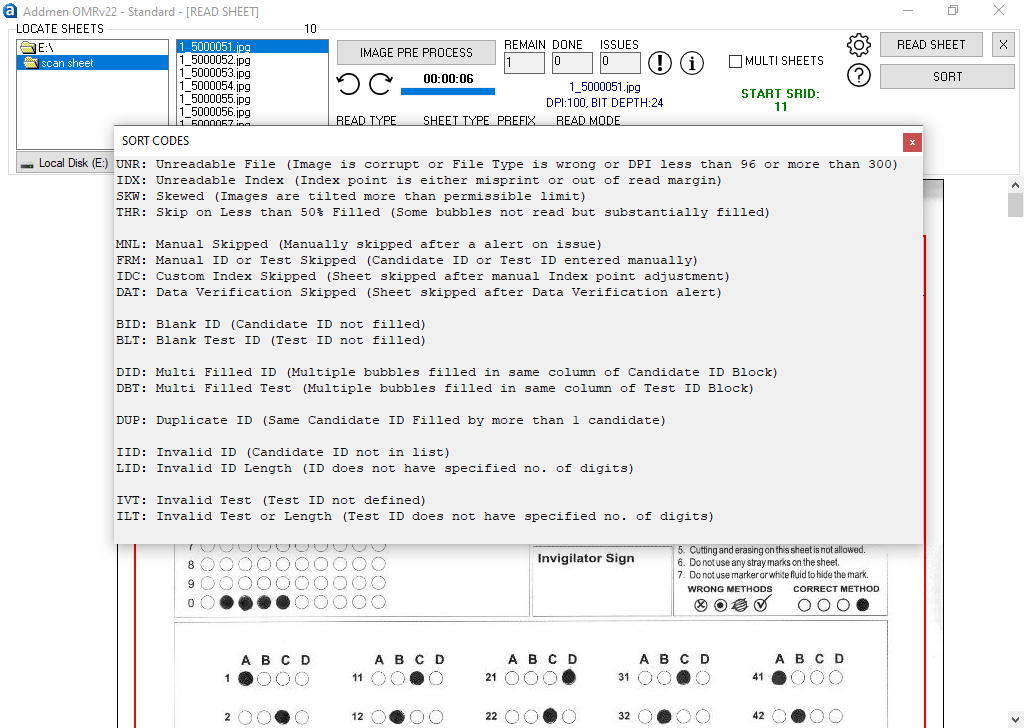
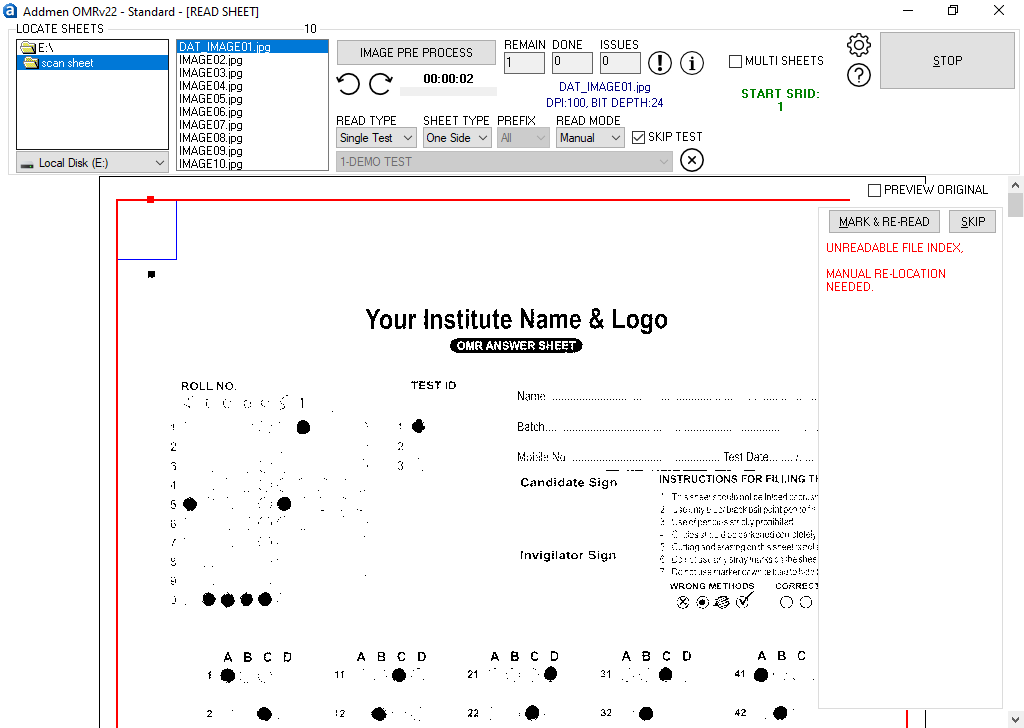
Problem sheets are renamed with relevant prefix so that they can be collectively select and resolve them. List of prefixes used for identification of improper sheets: [Fig 5.2A]
UNR: Unreadable File (Image is corrupt or File Type is wrong or DPI less than 96 or more than 300)
IDX: Unreadable Index (Index point is either misprint or out of read margin)
SKW: Skewed (Images are tilted more than allowed limit)
THR: Skip on more than 50% filled (Some bubbles not read at the set threshold, but were substantially filled)
MNL: Manual Skipped (Skipped after a alert on issue)
FRM: Manual ID or Test Skipped (Candidate ID or Test ID entered manually)
IDC: Custom Index Skipped (Sheet skipped after manual Index point adjustment)
DAT: Data Verification Skipped (Sheet skipped after Data Verification alert)
BID: Blank ID (Candidate ID not filled)
BLT: Blank Test ID (Test ID not filled)
DID: Multi Filled ID (Multiple bubbles filled in same column of Candidate ID Block)
DBT: Multi Filled Test (Multiple bubbles filled in same column of Test ID Block)
DUP: Duplicate ID (Same Candidate ID Filled by more than 1 candidate)
IID: Invalid ID (Candidate ID not in list)
LID: Invalid ID Length (ID does not have specified no. of digits)
IVT: Invalid Test (Test ID not defined)
ILT: Invalid Test or Length (Test ID does not have specified no. of digits)
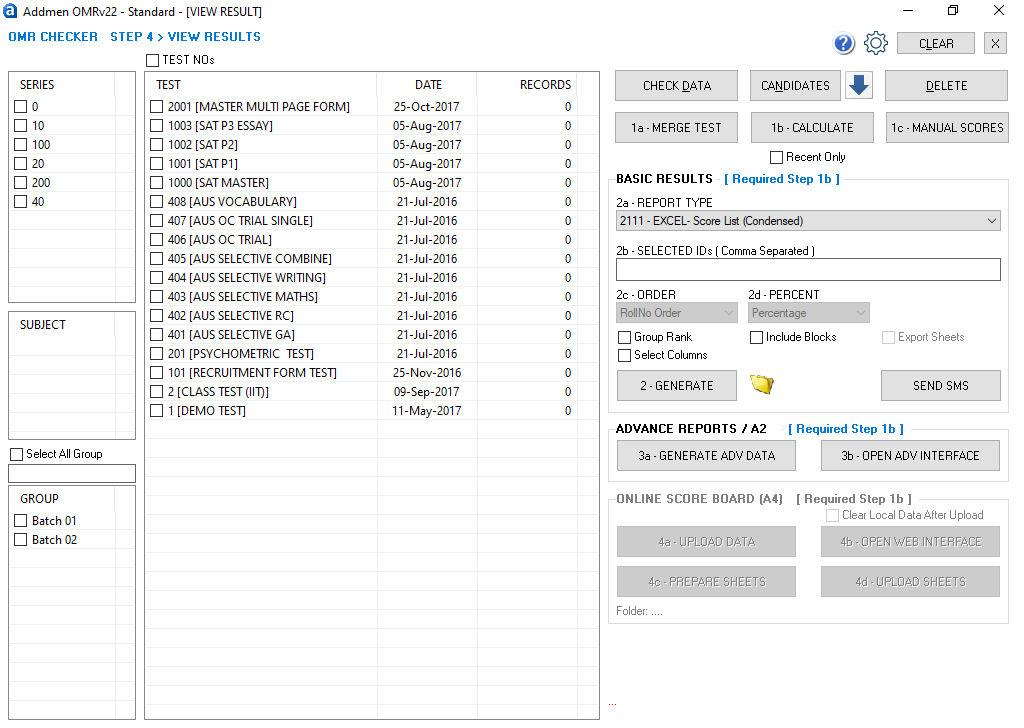
Any test that has been read, is visible in the ‘Test IDs’ panel and displays ‘0’ records.
Select the test and press the ‘CALCULATE’ Button. Now the ‘Test IDs’ pane will show some records for the number of sheets checked against this test.
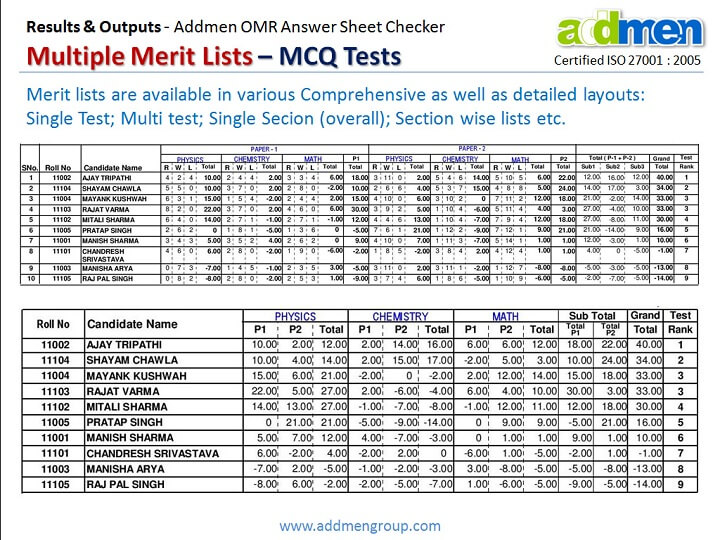
To obtain processed results in ready to use report formats, select Result Type and press SEARCH. By default all subjects and groups in that test are searched. You can select a specific Group or Subject to draw out a limited report.
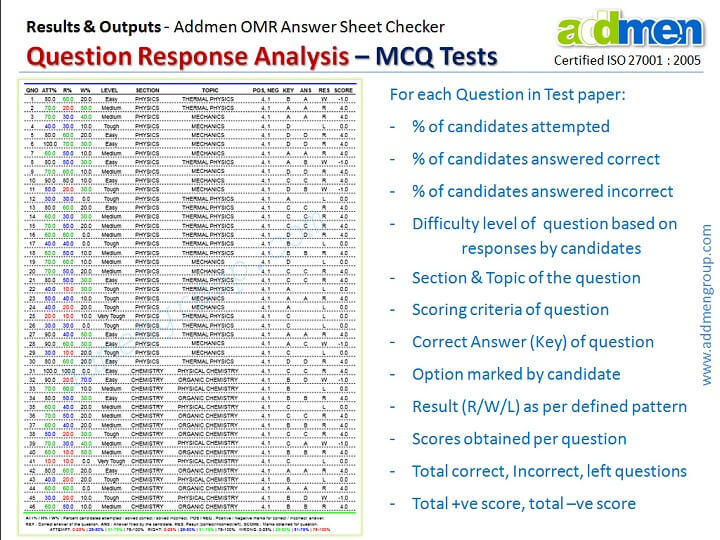
To obtain basic question response data and its detailed analysis select ‘Question Response’ option. ‘Mark List’ option allows you to select multiple tests at a time, while ‘Question Response’ limits the search to one Test ID only.
After searching for required records, Results can be previewed in ready to print layouts. You can select the order of listing and alternative parameters like percentage or percentile to be displayed on report.
Report preview layouts can be customized by the client also using Seagate Crystal Reports.
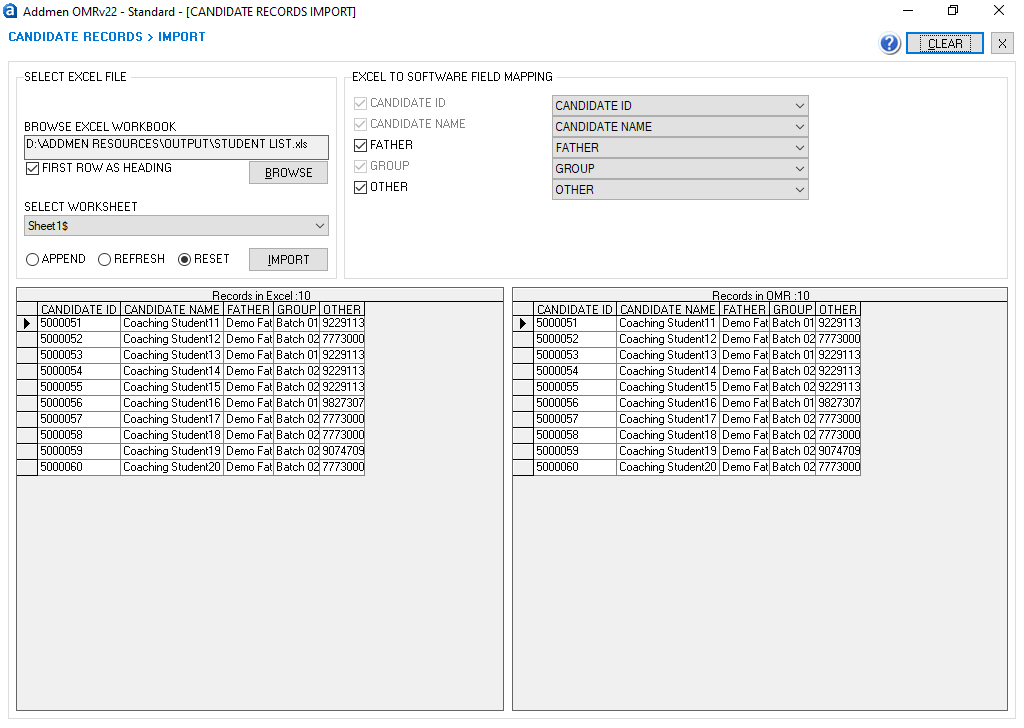
Candidate records are not compulsory to enter. Software checks and stores the result on the basis of unique ID only which is mentioned on the sheet. But if candidate records are entered, names can be displayed alongside ID in result reports. If you want to draw group wise result and ranks or read only for registered candidates, then candidate records must be entered into the software. [Fig 6.1A]
Candidate records can be directly typed into the software or can be imported from Excel sheet. [Fig 6.2A]
To import names from Excel, any worksheet containing any number of fields in any sequence can be used. But it should atleast contain unique ID (Roll No.) , Candidate Name and Group information by any column name. Import from Excel panel gives you the freedom to select any field from your Excel sheet to transfer information in the desired field in the OMR software.
To add more records to existing records in software, select APPEND option.
To completely remove previous records and add new ones, select RESET option.
To keep previous Roll Nos. and to update them and add new records, select REFRESH option.
Results can be exported directly to XLS(Excel), MDB(Access), XML, CSV and DBF(DBASE) formats. Exported files are created in DATA folder at the installation location (ADDMEN folder). Default export format can be set in settings panel. [Fig 6.3A]
Any report can be drawn as PDFs by pressing the CREATE PDF button. For example, if the graphical performance report has 50 pages and there are 5 pages per candidate in the report and you want to create pdf to send to top 3 candidates, then following values will be filled to create PDF: [Fig 6.4A]
Pages From=1; Pages to=15; Pages/PDF=5
This will generate 3 PDF files having 5 pages each for the first 3 candidates in the report. About PDF Merger
Excel exported output can be used for sending SMS through Addmen Desktop SMS utility which is installed with the OMR Software and can be found in ADDMEN folder. Exported Access file (OMRDBNET.MDB) can be used to send SMS through ECAS. To send reports through email, individual candidate Test Analysis PDFs can be created as explained above and attached and sent.
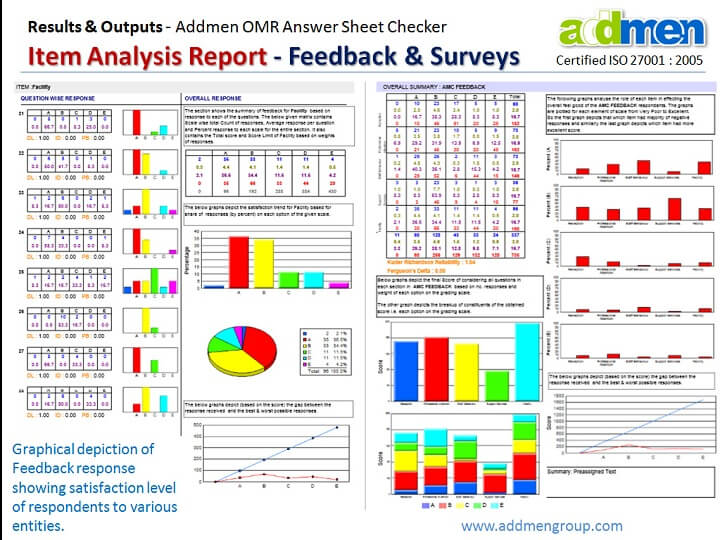
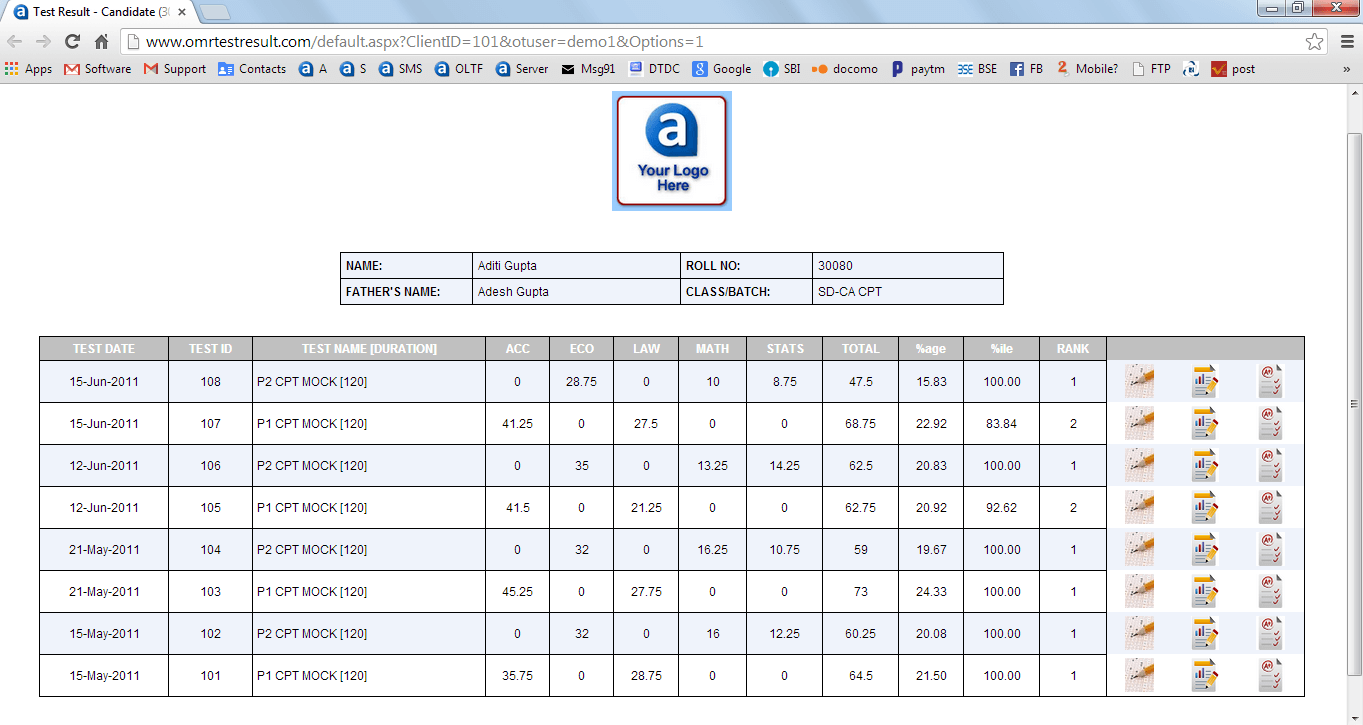
Using the Online result facility, candidates can see their individual history of results, sheets, analysis and solution of all test appeared, presented in a tabular format in a single window on your website. The facility is not free and the user shall be able to upload only if his account has been activated on the website. [Fig 6.6A]
Steps to upload result online.
Select Test to be uploaded and press SEARCH. After searching press UPLOAD button to upload results to Server. Externally edited database can also be uploaded by selecting ‘External Data’ checkbox to upload manipulated results.
If a series of test each containing single subject are linked and are to be presented as a single entity on the website, they must be selected together and then searched and uploaded.
Candidate OMR Sheets and Test Analysis PDFs can be uploaded for display on website using the FTP login given to the user.
Steps to Upload OMR Sheets & Solution
Open 'My Computer' and type your Host Address ( ftp://omrtestresult.com ) in the address bar and press enter.
Login Panel will appear on the screen. Enter your username and password and click on logon button.
If login screen does not appear then click on 'File Menu > Login as Command'.
If login is successful then your FTP content will display in the window.
Create a folder by name of desired TEST ID at server.
Copy the OMR sheets and PDF files generated by OMR Software in the ADDMEN/DATA folder and Paste these files into the TEST ID folder created at server.
Solution (.PDF) file can also be pasted in the same TEST ID folder created on the server.
6.6A
7. Preferences & Settings
Please Note: These settings explanation has been provided for understanding the scope & flexibility of software, please make sure users do not tamper with the settings unless they understand the complete meaning and implication of the same and unless they are guided by us to do so.
These settings can be accessed from Home Screen because these effect the entire program and are not related to any particular step of operation.[Fig 7.1A]
(A) Change Password
To enable password protection on the “Step 2 > Enter Answer Key” and “Preferences”
Default password is blank and protection is off.
(B) Delete all test data
To completely clear the database of all the tests created and read and processed data stored for them. This leaves the settings saved but removes the test definition and data.
(C) Organisation Name
You can add your Organisation Name which will be then visible on your homescreen and as header in reports which you generate.
(D) Backup Path
Select the location where you want backup to be stored at time when you click upon Backup button.
(E) SQL Server Credentials
Enter crendentials of your SQL server (server, username, password, database) to connect SQL with OMR software.
You can check if the SQL is connected by making a click upon 'Check SQL Connection' button.
Numeric blocks on OMR sheet are used in Roll No, TestID, Integer Type Questions, Phone, Date of Birth and many other information blocks like Gender, Caste, Category, Centre Code etc. These numeric blocks have generally 10 Rows and columns equal to number of digits of value to be filled in. Some OMR sheets have the first row of the block starting from 1 while others have the first row of the block starting from 0.
Thus accordingly choose the parameter value between 0 & 1. Default is 1
(B) Response Threshold [5-100]
This is response sensitivity. Tick marks and pencil filled bubbles need more sensitivity to detect than bubbles fully filled with blue/black pen. Lower the filling density or size lower the response threshold and vice versa.
The parameter value is set accordingly between 5 to 50.
Default is 30 for process having full pen filled bubbles.
In case of pencil filled bubbles, decrease threshold to 15-20.
In case of tick mark, decrease threshold to 5-15.
(C) Skip Threshold (Upper, Lower) [0-100]
Upper Skip Threshold is used to detect over filling. It is not for general use of all users. It is effective in case of certain users only who have customized software.
The Upper Skip Threshold value is set accordingly between 50 to 100.
Default value is 0 for no detection.
Lower Skip Threshold is used to detect under filled bubbles that had substantial filling but have been marginally skipped due to not meeting the Response Threshold. It is of good help to decide the threshold value. It is effective in case where the filling in most of the lot is inappropriate or varies a lot because of use of Pen & Pencil both..
The Lower Skip Threshold value is set accordingly between 0 to Response Threshold.
Default value is 50% of Response Threshold for more careful detection.
(D) Key1 Length [0-10], Key2 Length [0-10]
Set the LENGTH and RANGE of Candidate ID and Test ID fields, in case they are fixed in your institute. This will help in additional vigilance of erroneous filling of sheets.
(E) Read Margin [Top, Bottom, Left, Right]
This parameter is used to clip off dirty edges or unwanted area of the scanned images. It distance from the edge of the page/image measured in pixels. Too tight margins leaving little space outside index points are not recommended. However, in case of machine readable sheets margins are kept tight to eliminate timeline.
To be adjusted as the case may be for current scanning lot.
Default value is 10,10,10,10 i.e. 10 pixels for all directions.
(Ver 15: Margines can be adjusted by dragging. This value based manual setting has been removed.)
(F) OCR Read Angle [0,90,270]
This parameter is used to read rotated/vertical OCR fields at 90 or 270 degrees.
Default value is 0 for reading horizontally printed values.
(Ver 15: OCR/ICR at any angle can be read. This setting has been removed.)
(G) Maximum Acceptable Skew (in pixels)
Sometimes due improper placement in scanner or scanner defect the images are formed rotated. While sometimes due to defect in the scanner roller mechanism, the images formed are distorted as a parallelogram. This distortion/skew defect is different from being a rotated image.
The software has arrangement to attend and correctly read rotated / skewed images. Almost even in heavy skews/rotations, the software reads the image correctly, but beyond a certain degree, it prompts the user for manual verification of what it has read.
To activate the alert beyond a skew limit of 10 pixels set the value to 10.
It can be set to 20 for less prompts.
Default value is 10 but this is for high sensitivity to distortion.
(H) Store Images Into Database[0=No; 1=Database+Folder; 2=Folder]
In order to save the image of an answer sheet or a form for later reference or resolution of erroneous cases, enable this feature. The corresponding stored images of the sheet will be seen at the Manage Data panel when a read record is selected.
Though enabling this feature increases the size of the read database (OMRVALUE file) manifold.
Certain forms contain image/picture blocks which are scanned and stored as it is without being converted into tabular data. The images of all the picture blocks are also stored in the FORMPHOTO folder at the DATA location. The name of each image being as BlockID-FormID.BMP
Default value is 0 for no image storage.
(I) Multipage Sheet Suffix (S1, S2)
In case of two sided sheets scanned using a duplex scanner, the front and the backward images are linked by the same name separated by a suffix. The second side of the sheet is usually created using the suffix which the software recognizes to attach the read values of both sides.
When we have to read Duplex sheet, generally we use suffixes A, B
Default value is BLANK.
(J) Index Point Size [Width, Height]
This parameter is used to detect the index point of the given size. Upto version 11 the index size was 10X10 pixels, since version 12 it is possible to have smaller index points upto 3X3 pixels. It is also possible to have rectangular index points as 10X3 pixels.
The smaller the index the greater is the ruggedness in case of skew or rotated sheets. But on the other hand, smaller index points require absolutely clean scanning with no stray marks. In case a sheet having smaller index point is read using higher value of this parameter then it will give the message of invalid index.
Default value is 7,7
(K) ID Replace 1/2/3[0=Off/Column No, Values=V1|V2|...]
To obtain alphabetical form IDs, alphabet/general block can be used. To obtain numeric form IDs, numeric block can be used but to obtain alphanumeric form IDs, we use a Numeric Block with special arrangement to replace the numeric values of some column to alphabetical value. In current version upto 3 columns can be replaced with alphabets. This feature is only available with form ID field.
To read a column as alphabet, enter the column number separated by comma and followed by 10 values that would appear as replacements of 10 numerical values each of them separated by pipe “|”.
For example to obtain a form ID like F2010M, do as follows:
Insert a 6 column numeric form ID block on your sheet layout.
Set the “ID replace 1” parameter value to- 1,A|B|C|D|E|F|G|H|I|J
Set the “ID replace 2” parameter value to- 6,M|N|O|P|Q|R|S|T|U|V
Default value is 0 for no replacements.
(L) Auto ID [0=No; 1=Yes; 2=Yes+Chk]
To provide Auto system generated unique ID for each and every sheet.
(M) Leading Zero ID on Read [0=No;1=Marked;2=Always]
To read Leading Zeros in the field of Form ID or Candidate ID.
For eg. 0001, 0002 etc
(N) Color To B/W Threshold [1-255]
This is colour or contrast sensitivity. Colour sheets containing tick marks and pencil filled bubbles need to suppress the outline of background circles or boxes to detect even the slightest marks. Higher the threshold, lower the background colour sensitivity and vice versa.
The parameter value is set accordingly between 1 to 255.
Default is 128 for process having light pink bubbles.
This will help you to spot what software is reading with the help of color coding.
If the value is set to one only green indicators appear only at the bubbles that have been read.
If the value is 2, yellow indicators appear at all locations where the software has searched for a bubble.
If the value is 3, red indicator will appear at bubble which is filled more than Lower Threshold and because of which this sheet is being alerted.
(P) Default Sheet Dpi
Lowest 100 Dpi is acceptable to the software. 100 Dpi is also suggested for speedy scanning, light images and quick reading. Default is 100. Software converts all sheets to 100 Dpi while reading.
Some sheets are required to be read at higher 150 or 200 Dpi for the sake of barcode or image. The parameter value is set accordingly either 150 or 200.
(Q) Auto Accept Skewed Sheets
Software will automatically accept without showing alert, the images which are detected as skewed (beyond Maximum Acceptable Skew) but the count of bubbles read at variable thresholds is same.
(R) Default Read Mode [0=Auto; 1=Alert; 2=Manual]
You can set the mode of reading according to your requirement.
(S) Continuous Reading [0=No; 1=Yes, Prefix]
Software will automatically read the sheets having a given “PREFIX” within the folder. This feature is used for automatically and continually reading sheets as soon as they are scanned.
(T) Check Index Point in Vertical (LT, RT, LB, RB) [0=No; 1=Yes]
Ideally Software approaches index point horizontally. By this setting software will approach the index in vertically.
(LT-Left Top, RT-Right Top, LB-Left Bottom, RB-Right Bottom)
Distance till which the software will search index point from the corner of the sheet.
(V) Read/Sort from Sub Folders [0=No; 1=Yes, Prefix]
Software will automatically read the sheets having a given “PREFIX” within the folder and all its subfolders. This feature is used for automatically and continually scanning folders of different groups/branches/cetnres under the same test.
(A) Use Timestamp in Export [0=No; 1=Yes][Fig 7.3A]
If the value is 0, the exported file will be replaced every time we export. If the value is 1, a new file with latest time stamp will be created.
(B) Export Format [0=CSV; 1=Excel; 2=Access; 3,4=Dbase; 5=XML]
Select suitable value to set required output format as default.
Default is 0.
(C) Ranking Pattern [0=Regular; 1=Skipped]
Regular Ranking pattern – If more than one candidates have same score, they are given same rank. The next rank is in subsequent order. While in case of skipped rank the next as many rank are skipped as many candidates are there on the same rank.
(D) Digits for Test Series [1,2,3]
Multiple sets tests can be formed not only with 3 or 4 sets, upto 999 tests.
Usually there are 3-4 question papers forming sets of a test, hence the value is set to 1.
If there are 20 test papers linked in a series, then the value must be set to 2
In case the test ID is long, then set the value accordingly.
(E) IDI Sample Size [1-50%]
The value defines the % of candidates to be considered from the top and bottom of the score list to draw Item Discrimination Index.
(F) Calculate RWLC for Analysis [0=No; 1=Yes]
Calculating RWLC details for all graphical analysis reports may be very hefty for the system. So this process can be skipped, if not required.
(G) Candidate Records Field Captions
The headings of the candidate table can be changed according to organization. This has no programmatic significance, bt can be done for the users visual convenience.
(H) Set Minimum Marks [0=No; 1=Yes, Marks]
If a candidate has scored less than the specified marks, then he will get atleast minimum marks.
(I) Sheet Export Count [0=All; Top N]
Sheets can be exported to smaller compressed size in JPG format while export of CSV Question Response data. This will provide smaller size of images to be uploaded in Online Results system on the website.
7.3A
8. Added Features Of OMR Professional Version
(A) SQL database used in backend for efficient processing.[Fig 8A]
(B) Sheet with miss-placed/miss-aligned column and rows can be calibrated [Fig 8B]
(C) An inappropriate/unidentified index point can be pointed or virtually located by manual judgment this avoids re-scanning of miss printed sheets[Fig 8C]
(D) Variable data can be printed in OCR/Barcode blocks [Fig 8D]