 |
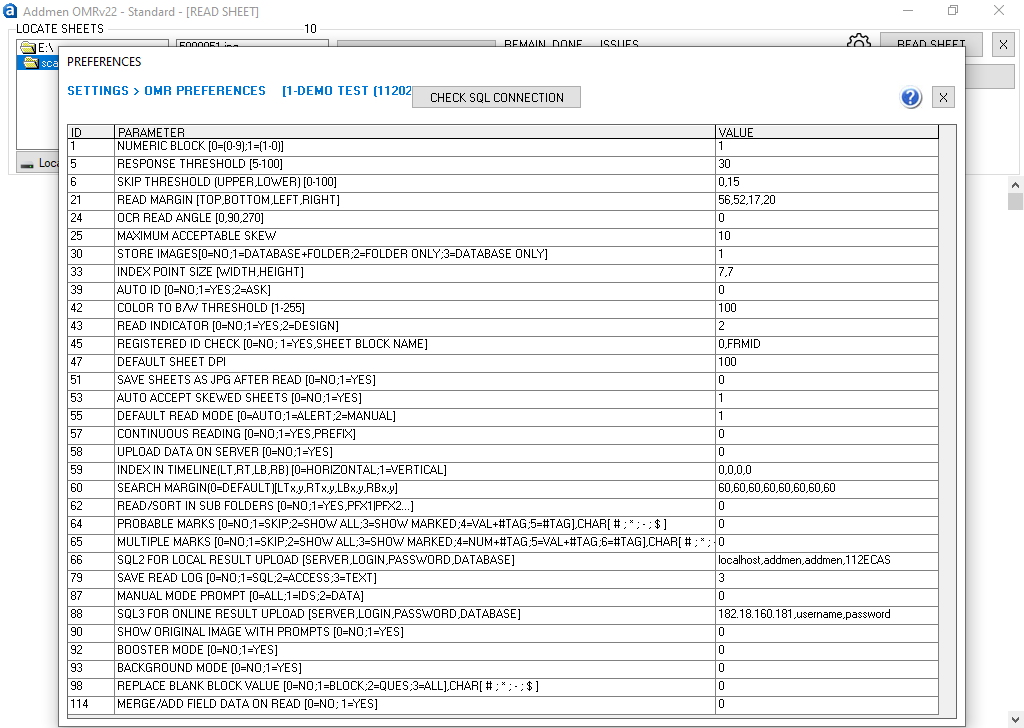
Numeric blocks on OMR sheet are used in Roll No, TestID, Integer Type Questions, Phone, Date of Birth and many other information blocks like Gender, Caste, Category, Centre Code etc. These numeric blocks have generally 10 Rows and columns equal to number of digits of value to be filled in. Some OMR sheets have the first row of the block starting from 1 while others have the first row of the block starting from 0.
Thus accordingly choose the parameter value between 0 & 1. Default is 1
(B) Response Threshold [5-100]This is response sensitivity. Tick marks and pencil filled bubbles need more sensitivity to detect than bubbles fully filled with blue/black pen. Lower the filling density or size lower the response threshold and vice versa.
The parameter value is set accordingly between 5 to 50.
Default is 30 for process having full pen filled bubbles.
In case of pencil filled bubbles, decrease threshold to 15-20.
In case of tick mark, decrease threshold to 5-15.
(C) Skip Threshold (Upper, Lower) [0-100]Upper Skip Threshold is used to detect over filling. It is not for general use of all users. It is effective in case of certain users only who have customized software.
The Upper Skip Threshold value is set accordingly between 50 to 100.
Default value is 0 for no detection.
Lower Skip Threshold is used to detect under filled bubbles that had substantial filling but have been marginally skipped due to not meeting the Response Threshold. It is of good help to decide the threshold value. It is effective in case where the filling in most of the lot is inappropriate or varies a lot because of use of Pen & Pencil both..
The Lower Skip Threshold value is set accordingly between 0 to Response Threshold.
Default value is 50% of Response Threshold for more careful detection.
Set the LENGTH and RANGE of Candidate ID and Test ID fields, in case they are fixed in your institute. This will help in additional vigilance of erroneous filling of sheets.
(E) Read Margin [Top, Bottom, Left, Right]This parameter is used to clip off dirty edges or unwanted area of the scanned images. It distance from the edge of the page/image measured in pixels. Too tight margins leaving little space outside index points are not recommended. However, in case of machine readable sheets margins are kept tight to eliminate timeline.
To be adjusted as the case may be for current scanning lot.
Default value is 10,10,10,10 i.e. 10 pixels for all directions.
(Ver 15: Margines can be adjusted by dragging. This value based manual setting has been removed.)
This parameter is used to read rotated/vertical OCR fields at 90 or 270 degrees.
Default value is 0 for reading horizontally printed values.
(Ver 15: OCR/ICR at any angle can be read. This setting has been removed.)
Sometimes due improper placement in scanner or scanner defect the images are formed rotated. While sometimes due to defect in the scanner roller mechanism, the images formed are distorted as a parallelogram. This distortion/skew defect is different from being a rotated image.
The software has arrangement to attend and correctly read rotated / skewed images. Almost even in heavy skews/rotations, the software reads the image correctly, but beyond a certain degree, it prompts the user for manual verification of what it has read.
To activate the alert beyond a skew limit of 10 pixels set the value to 10.
It can be set to 20 for less prompts.
Default value is 10 but this is for high sensitivity to distortion.
In order to save the image of an answer sheet or a form for later reference or resolution of erroneous cases, enable this feature. The corresponding stored images of the sheet will be seen at the Manage Data panel when a read record is selected.
Though enabling this feature increases the size of the read database (OMRVALUE file) manifold.
Certain forms contain image/picture blocks which are scanned and stored as it is without being converted into tabular data. The images of all the picture blocks are also stored in the FORMPHOTO folder at the DATA location. The name of each image being as BlockID-FormID.BMP
Default value is 0 for no image storage.
(I) Multipage Sheet Suffix (S1, S2)In case of two sided sheets scanned using a duplex scanner, the front and the backward images are linked by the same name separated by a suffix. The second side of the sheet is usually created using the suffix which the software recognizes to attach the read values of both sides.
When we have to read Duplex sheet, generally we use suffixes A, B
Default value is BLANK.
This parameter is used to detect the index point of the given size. Upto version 11 the index size was 10X10 pixels, since version 12 it is possible to have smaller index points upto 3X3 pixels. It is also possible to have rectangular index points as 10X3 pixels.
The smaller the index the greater is the ruggedness in case of skew or rotated sheets. But on the other hand, smaller index points require absolutely clean scanning with no stray marks. In case a sheet having smaller index point is read using higher value of this parameter then it will give the message of invalid index.
Default value is 7,7
To obtain alphabetical form IDs, alphabet/general block can be used. To obtain numeric form IDs, numeric block can be used but to obtain alphanumeric form IDs, we use a Numeric Block with special arrangement to replace the numeric values of some column to alphabetical value. In current version upto 3 columns can be replaced with alphabets. This feature is only available with form ID field.
To read a column as alphabet, enter the column number separated by comma and followed by 10 values that would appear as replacements of 10 numerical values each of them separated by pipe “|”.
For example to obtain a form ID like F2010M, do as follows:
Insert a 6 column numeric form ID block on your sheet layout.
Set the “ID replace 1” parameter value to- 1,A|B|C|D|E|F|G|H|I|J
Set the “ID replace 2” parameter value to- 6,M|N|O|P|Q|R|S|T|U|V
Default value is 0 for no replacements.
(L) Auto ID [0=No; 1=Yes; 2=Yes+Chk]To provide Auto system generated unique ID for each and every sheet.
(M) Leading Zero ID on Read [0=No;1=Marked;2=Always] To read Leading Zeros in the field of Form ID or Candidate ID.
For eg. 0001, 0002 etc
This is colour or contrast sensitivity. Colour sheets containing tick marks and pencil filled bubbles need to suppress the outline of background circles or boxes to detect even the slightest marks. Higher the threshold, lower the background colour sensitivity and vice versa.
The parameter value is set accordingly between 1 to 255.
Default is 128 for process having light pink bubbles.
This will help you to spot what software is reading with the help of color coding.
If the value is set to one only green indicators appear only at the bubbles that have been read.
If the value is 2, yellow indicators appear at all locations where the software has searched for a bubble.
If the value is 3, red indicator will appear at bubble which is filled more than Lower Threshold and because of which this sheet is being alerted.
Lowest 100 Dpi is acceptable to the software. 100 Dpi is also suggested for speedy scanning, light images and quick reading. Default is 100. Software converts all sheets to 100 Dpi while reading.
Some sheets are required to be read at higher 150 or 200 Dpi for the sake of barcode or image. The parameter value is set accordingly either 150 or 200.
(Q) Auto Accept Skewed SheetsSoftware will automatically accept without showing alert, the images which are detected as skewed (beyond Maximum Acceptable Skew) but the count of bubbles read at variable thresholds is same.
(R) Default Read Mode [0=Auto; 1=Alert; 2=Manual]You can set the mode of reading according to your requirement.
(S) Continuous Reading [0=No; 1=Yes, Prefix]Software will automatically read the sheets having a given “PREFIX” within the folder. This feature is used for automatically and continually reading sheets as soon as they are scanned.
(T) Check Index Point in Vertical (LT, RT, LB, RB) [0=No; 1=Yes] Ideally Software approaches index point horizontally. By this setting software will approach the index in vertically.
(LT-Left Top, RT-Right Top, LB-Left Bottom, RB-Right Bottom)
Distance till which the software will search index point from the corner of the sheet.
(V) Read/Sort from Sub Folders [0=No; 1=Yes, Prefix]Software will automatically read the sheets having a given “PREFIX” within the folder and all its subfolders. This feature is used for automatically and continually scanning folders of different groups/branches/cetnres under the same test.
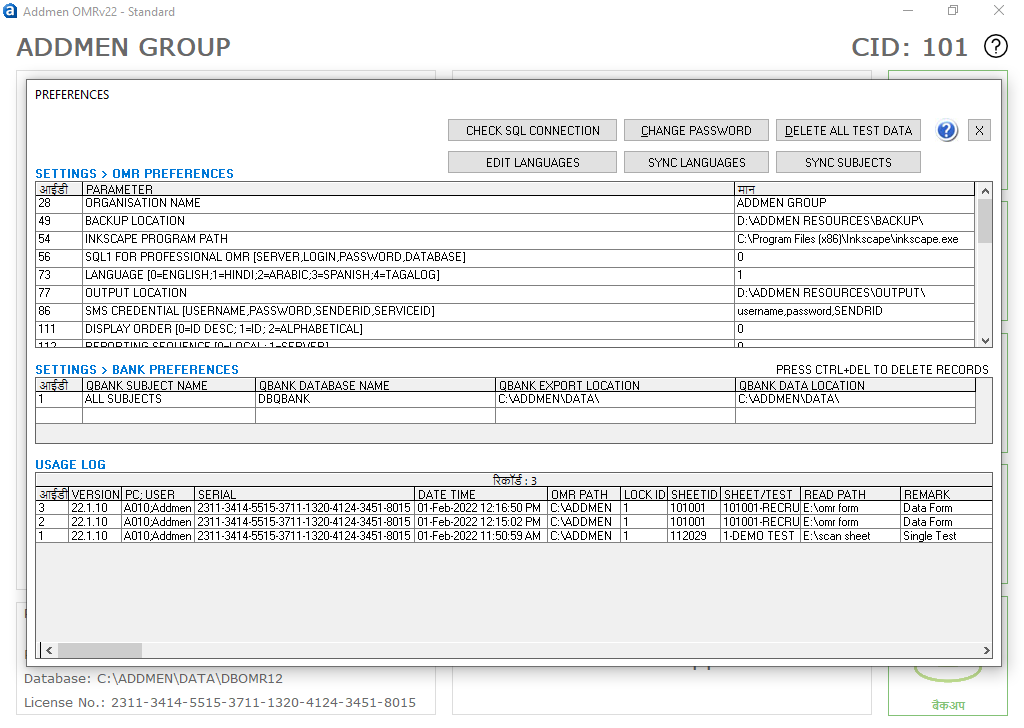
These settings can be accessed from Home Screen because these effect the entire program and are not related to any particular step of operation.
(A) Change Password To enable password protection on the “Step 2 > Enter Answer Key” and “Preferences”
Default password is blank and protection is off.
To completely clear the database of all the tests created and read and processed data stored for them. This leaves the settings saved but removes the test definition and data.
C) Organisation NameYou can add your Organisation Name which will be then visible on your homescreen and as header in reports which you generate.
(D) Backup Path Select the location where you want backup to be stored at time when you click upon Backup button.
Enter crendentials of your SQL server (server, username, password, database) to connect SQL with OMR software.
You can check if the SQL is connected by making a click upon 'Check SQL Connection' button.
 |
 |
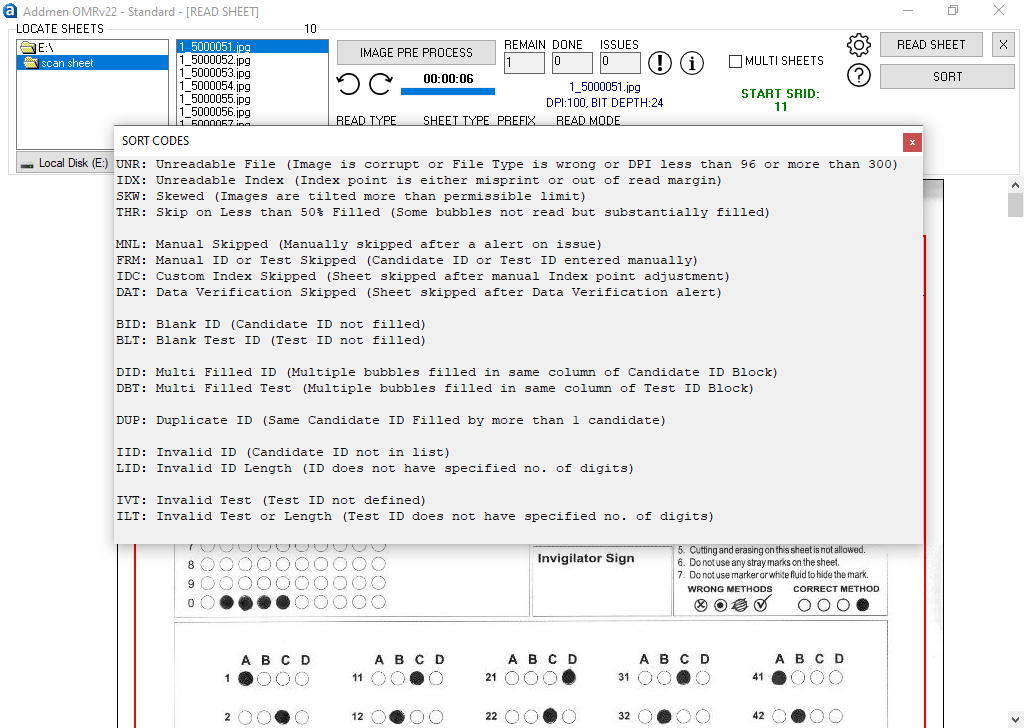
Problem sheets are renamed with relevant prefix so that they can be collectively select and resolve them. List of prefixes used for identification of improper sheets:
UNR: Unreadable File (Image is corrupt or File Type is wrong or DPI less than 96 or more than 300)
IDX: Unreadable Index (Index point is either misprint or out of read margin)
SKW: Skewed (Images are tilted more than allowed limit)
THR: Skip on more than 50% filled (Some bubbles not read at the set threshold, but were substantially filled)
MNL: Manual Skipped (Skipped after a alert on issue)
FRM: Manual ID or Test Skipped (Candidate ID or Test ID entered manually)
IDC: Custom Index Skipped (Sheet skipped after manual Index point adjustment)
DAT: Data Verification Skipped (Sheet skipped after Data Verification alert)
BID: Blank ID (Candidate ID not filled)
BLT: Blank Test ID (Test ID not filled)
DID: Multi Filled ID (Multiple bubbles filled in same column of Candidate ID Block)
DBT: Multi Filled Test (Multiple bubbles filled in same column of Test ID Block)
DUP: Duplicate ID (Same Candidate ID Filled by more than 1 candidate)
IID: Invalid ID (Candidate ID not in list)
LID: Invalid ID Length (ID does not have specified no. of digits)
IVT: Invalid Test (Test ID not defined)
ILT: Invalid Test or Length (Test ID does not have specified no. of digits)
Addmen Group Copyright 2025. All Rights Reserved.